Showing posts with label Blue and White China. Show all posts

5 March 2017

Florets - Floral Quote - # 142 - by Jane Packer


'Florets - Floral Quote' is a series of blog posts where I feature quotes by authors - mostly well known but you will also find some obscure ones.

All of them have written one or several books about flowers, gardening, interior styling or interior design. Many are experts in their field but what is the most important is that they are all passionate about flowers.

I love books and in my ever growing library I look for quotes that I hope will be both helpful and useful for everybody who is arranging and styling flowers.


pale blue hydrangea and gravy drainers


" In the kitchen, it's fun to use containers that give a nod and a wink to their surroundings. Search your cupboards for quirky kitchenware such as tea caddies or coffee pots, or wash out and reuse glass food jars or milk bottles. Enamelled jugs are the perfect home for a sheaf of tulips, and you can pop a dome-shaped posy of sweet williams into a colourful glass sundae dish. Vintage coffee cans are the ideal receptacles for sooty-eyed anemones or a single luscious camelia."
~ Jane Packer ~ 


[Jane Packer (1959-2011): British top London florist, founder of Jane Packer Flowers and flower school; and author of thirteen books.]

[Quote: From Jane Packers last book At Home with Flowers (2011).]

[Flowers: I have used a beautiful pale blue hydrangea. Flower from my local flower stall in North London.]

[Vases/Containers: A vintage silver plated sugar bowl found at one of the many London car boot sales.]

[Props: Vintage blue and white china gravy drainers found at London antique markets.]

[Styling and photography: © Ingrid Henningsson/Of Spring and Summer.]

*****
Enjoy your flower arranging and have a fabulous and floral weekend!

Thank you for visiting 'Of Spring and Summer' - I will be back tomorrow morning with another Floral Media. I'm reviewing a brand new book by the photographer Georgianna Lane. It's called Paris in Bloom and will be published on March 14th.

I'm looking forward to seeing you back here then.

Ingrid 

~ xoxo ~

*****
P. S. Did you know that you can subscribe to receive a notification via email whenever I have a new blog post. Just fill in your email address at the top of my blog on the right.

P. S. If you are looking for more floral inspiration you can go over and have a look at my Pinterest boards. I now have just over 12 000 followers and around 200 boards all relating to flowers, flower styling and flower arranging. There are boards on individual flowers and shows how to arrange them. Other boards show different ways of using vases and containers. Simply click on the link below and it will take you straight there.

Pinterest: https://www.pinterest.com/ofspringsummer/

27 February 2015

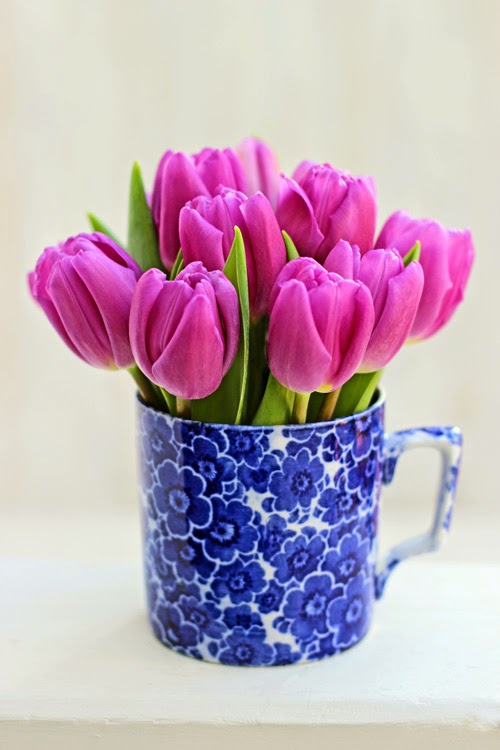
A Bunch for the Weekend - # 41 - Hot Pink Tulips in a Cup


Pink Tulips in a Cup

Today on 'A Bunch for the Weekend' - I'm featuring some hot pink tulips in an antique blue and white floral cup.

Early tulips are fabulous at the moment and will be for a few more months. 

Pink Tulips in a Cup

You'll need:

- 15 stems of tulips in a bright colour
- a cup in a contrasting colour - in this case I have used an antique blue and white floral china cup
- a few little trinkets in the same colour as the cup - in this case I have used three vintage blue glass mini bottles 


For conditioning the flowers - you'll also need:

- a pair of florists scissors
- a florist bucket

Condition the flowers by removing any leaves that would end up below the water line in the vase. This is to reduce any growth of bacteria from deteriorating leaves. Also remove any broken or bruised leaves.

Cut the stems at an angle - this is to increase water absorption.  

Put in a clean container with fresh water and leave in a cool, dark place over night or at least for a few hours, to let the flowers absorb the maximum of water, before making the final arrangement.

You might have to re-cut the stems while making the final arrangement to suit the size of the vase or container and to get the right proportions.


Pink Tulips in a Cup

Cut the tulip stems quite short - short enough to sit right above the edge of the cup. Try to leave the top leaf on - to give just that little bit of green and to break up the mass of strong pink.

Fill the cup quite tightly - to give more impact both with colour and volume.

Pink Tulips in a Cup

Tulips continue to grow in the vase - so you have two choices.

1. When you change water in the vase re-cut the stems to the height you want them.

2. Change the water as usual - but let the tulips do whatever they want to do and enjoy their natural beauty.

Pink Tulips in a Cup


The three little cobalt blue glass bottles are vintage and they nicely pick up the blue colour on the cup.  

One used to contain 'bitter' - the other two with metal caps - I have no idea what they were used for. Bitter was used as an additive in cocktails and to promote appetite and digestion.   

This little arrangement is simple, quick and easy - BUT with a lot of strong colour and some attitude!

Are you ready to add some colour to your life? Well - colour is sometimes so welcome at this time of year - don't you think?


Pink Tulips in a Cup


Have a Happy Floral Friday and Enjoy Your Weekend!

~ xoxo ~

Ingrid

[Styling and Photography © Ingrid Henningsson for Of Spring and Summer]

23 January 2015

A Bunch for the Weekend - # 36 - Blue Hyacinth


Blue Hyacinths


This week on 'A Bunch for the Weekend' - I'm featuring some blue Hyacinth.

The hyacinth season usually lasts well into the spring. It's an amazing flower that comes in a large variety of colours such as - pink, white, blue, purple, yellow as well as others.

A lot are grown in pots but you can now also buy them as cut flowers - often with part of the bulbs still attached - the flower lasts much longer that way.


Blue Hyacinths


You'll need:

- 10 stems of Hyacinths 
- 3 different size bowls or wide containers - in this case I have chosen some blue and white floral china bowls in three different patterns 


For conditioning the flowers - you'll also need:

- florists snippers or scissors
- a florist bucket

As always - you need to condition the flowers - remove all the lower leaves that would end up below the waterline in the vase. Cut the stems at an angle - to increase water absorption. Put in a clean container with fresh water and leave in a cool place over night or at least a few hours before making the final arrangement. 
You might have to re-cut the stems while making the final arrangement to suit the size of the vase.

Blue Hyacinths

It was not easy finding flowers in London this week. After the fire in the Euro Tunnel a lot of deliveries are delayed. 

I did find these blue Hyacinths - but I was in a rush and made the mistake of not examining them properly. So when I got them home and unwrapped them - I was not happy. A lot of the short stems were curved and you can't really straighten them.

I still wanted to use the flowers and came up with the idea of displaying them in a few bowls just floating in water. I picked out a three blue and white floral bowls in different sizes. 

In the largest bowl I displayed five of the flowers with straight stems - just leaning on the edge of the bowl with the bottom of the stems in water.


Blue Hyacinths

In the second I snipped off a lot of the open flowers to simply float as a mass of single flowers and in the third one I mixed single flowers with the tips of five flower stems that still had green unopened buds.

This is a very easy and quick way to display not very perfect flowers - rather than resorting to putting them on the compost heap.

I love how every single little flower is different to the next and the scent is gorgeous! Just a different way to enjoy and display flowers.

Blue Hyacinths


Have a Happy Floral Friday and an Enjoyable Weekend!

See you next Monday with another 'Tiny Blooms'.

~ xoxo ~

Ingrid

[Styling and Photography © Ingrid Henningsson for Of Spring and Summer]

12 January 2015

Tiny Blooms - # 6 - Pink Gerbera


Pink Gerbera


This series of blog posts - called 'Tiny Blooms - are about small arrangements. Small - might be the size of the container or it could be the size of the flowers or the amount of stems in each container. It will also be that the arrangement is minimal both in presentation and that it's quick and easy to do. Apart from that there are no other strict rules - I'm allowing myself a lot of creative freedom!


Pink Gerbera


How do you tackle the January blues? Well, maybe some bright colours might help. Gerberas are almost always bright in colour and they also seem to have a happy disposition. They just look happy!

Pink Gerbera

Gerberas come with long stems and no leaves - so all you have to do is to cut the stems at an angle and put them in some water.

It's often recommended that you use warm water and that you put them in shallow water. The hollow and hairy stems can easily rot - so don't put too much water in the vase.

Gerberas are also a perfect flower to float in a bowl of water - just cut the stem just under the flower head and pop it in a bowl with water and it will look gorgeous for a week or more.

I have combined the hot pink flowers with some bright blue objects - a Victorian blue and white floral bowl, a Mexican tile and a Norwegian hand-blown blue glass vase from the 1960's.

After a busy month like December its quite nice to be able to create some quick and easy floral arrangements and put some colour back into our lives. 


Pink Gerbera


Have a Lovely Floral Day!

I'll see you later in the week!

~ xoxo ~

Ingrid 


[Styling and Photography © Ingrid Henningsson for Of Spring and Summer.] 

10 June 2014

Flowers from the Flower Market - # 4 - Delphiniums


Delphiniums are magnificent at this time of year and I just could not leave the market without bringing some home. It's a flower that come in many different pink and blue colours as well as white and peach. 


 The one little difficulty with Delphiniums are that they are quite tall - so you need a tall vase. Tall vases become top heavy so they are not always easy to deal with but apart from that it's a great flower that you don't have to do a lot to and lasts well. 


It's a flower that starts flowering from the bottom of the spike while the top still has tight buds. You will need to remove the lower spent flowers as the buds open up. 


Like always condition the flowers by removing any lower leaves that will end up below the waterline in the vase. Cut the stems at an angle and put straight in a clean container with water - and leave over night in a cool place. 


Delphiniums are a flower that remind me of an old-fashioned country garden and I thought these blue and white floral vases had the same feel about them. 

Just to be on the safe side I put all the old vintage vases on little saucers - also blue and white floral china. Don't ever trust an old china vase - as they might leak and ruin your tabletop. 


You don't need to do very much to delphiniums - they are perfect on their own and their loose country garden style is easy and charming.

Keep the tall spires all the same height to give a neat finish to your arrangement.  


I was able to make one lower arrangement with a light pink Delphinium - that I only had one stem of. I cut it quite short - put it in a low vase and used some stems with unopened buds in the back. Simple and easy!  


Have a Lovely Floral Day!

See you later in the week!

xoxo Ingrid

[Styling and photography © Ingrid Henningsson for Of Spring and Summer.]


21 May 2014

FLOWERS by ingrid and titti - Spring Wreath


The theme for this week of FLOWERS is 'Spring Wreath' and making a spring wreath was both a challenge and lots of fun. I wanted a wreath that I could hang on a door or in a window; or one that I could just lean against a wall. 

I also wanted a wreath that would last for more then a day - neither did I want to use oasis or make one using just twigs. 
I didn't make it very easy for myself as I imposed quite a few restrictions.

I had to think long and hard about what was available to buy or what I could find in my own garden - especially at this time of year when plants have a lot of fresh soft growth. I wanted something that would not whither away or drop their leaves but stay green for a while. 

What I ended up using was rosemary and box/Buxus sempervirens from my own garden - I knew both would last for a while without water. I also used a small amount of Alchemilla mollis flowers that lasts out of water for a few days.


I started off with a wire coat hanger that I shaped into a circle. Using the notch for cutting wires on my Felco secateurs I cut off the hook on the hanger. That part is up to you - some of you might like to keep the hook as it could be handy to use if you want to you hang it up. You could paint it or cover it with fabric.

I made little bunches of box and rosemary. Trim the stems to the same length and wrap florist's wire around the bottom of the stems. I then wired the bunches onto the coat hanger. Starting at the top right - overlapping the bunches to hide the ends - winding the wire around as you go along. When you have done the right side you do the same on the left. 


I used a bunch of Alchemilla mollis to hide the gap at the bottom - even though I later turned the wreath around so that the Alchemilla was near the top.


For some added interest I made two little arrangements to go with the wreath - the last of the pretty English bluebells and some lovely stock flowers.


I cut the stems of the bluebells very short and packed them tightly in a vintage enamelled container - that was once used to contain soda crystals.


In a Victorian blue and white floral patterned vase I stuck three stems of stock flowers. 


And I continued the blue theme with some other bits and pieces of knick-knacks - a large oval platter, a pretty mini cup my daughter gave me as a present and a contrasting checked blue and white fabric. 


My collaborator on FLOWERS - Titti Malmberg over on HWIT BLOGG is also posting about spring wreaths today - so make sure to go over and see what she is doing.

Here is also a link to all the previous FLOWERS that Titti and I have done.

Have a Wonderful Floral Day!

See you later in the week.

xoxo Ingrid


14 May 2014

Flowers from the Flower Market - # 3 - Bluebells and Cow Parsley


I was very pleased to see that a brand new flower stall had joined my local farmers' market. So this time my 'Flowers from the Flower Market' is from Forever Green Flower Company - run by the lovely Cel Robertson and her husband Robert.
Their farm is based in Norfolk and they grow their own flowers and sell seasonal hand-tied bouquets and posies.


I loved the combination of English bluebells and cow parsley and bought three bunches.

Their flowers were very popular - they sold all but four of their bouquets on their first day at the market. A great start for Cel and Robert and for British grown flowers and I'm pleased to say that I was one of their first costumers!


While I was conditioning the flowers I separated the bluebells and the cow parsley - as I wanted to make a few different arrangements. 

In the first one I put all the bluebells in an old vintage jug from Sweden. It has little blue bell-shaped flowers on the side. The fabric is by Lotta Jansdotter.
   

I love the frothiness and simplicity of cow parsley and put all the stems in an opaque bulb vase - in my second arrangement. 


I wanted to keep everything almost white and very simple - so placing a few small vintage glass bottles with the flowers - on a little stool worked out well.


In the last arrangement - I combined all the bluebells and the cow parsley - using again the big jug and this time - wanting to make more of a statement - I placed the jug on a selection of blue and white china plates and finishing it off with a blue and white floral fabric.

Have a Wonderful Floral Wednesday!

See you later in the week!

xoxo Ingrid


Related Posts Plugin for WordPress, Blogger...