Showing posts with label Take 3 Flowers. Show all posts

24 November 2017

From the Archives - 27 October 2014 - Take 3 Flowers!


This post is part of a brand new blog series called 'From the Archives'. It will be previously posted blog posts that I feel are still relevant for some reason or another. 

It will always be a post from the same calendar month as we are in or it could be some of my favourite flowers from the same season - that still lifts my spirit. 

Flowers are so ephemeral - but their beauty caught on camera never fades.........!!


I'm starting a new series of blog posts called 'Take 3 Flowers' - I will show you how to make easy but beautiful and stylish flower arrangements - just using three different flowers. Sometimes one of the three will be some kind of foliage.

Using just three flowers will sometimes be a challenge - but it will also keep the cost down. Cut flowers can be expensive and foliage on the other hand tends to be cheap. You can use lots of it to help fill out the arrangement and to provide support for the other flowers. If you have a garden or access to one you can probably find some foliage to use from there.


In this first one - I'm using two different Chrysanthemums - they are both what's called 'spray' - that means that towards the top are several smaller stems with one flower on each stem. 


The light orange one has single daisy type flowers with a lighter centre. 


The other one has a light maroon colour and picks up the lighter colour on the back of its petals.


The green foliage that I've used is called soft Ruscus. Used a lot by florists and quite easy to find. But really any small- leaved green foliage would do. 

If you are in luck the Ruscus might have some of its bright orange berries - as an extra little bonus. 


You'll need: 

- 10 stems of Chrysanthemums in two different colours
- 5 stems of soft Ruscus or similar green foliage
- a fairly large vase or container - in this case I have used a large vintage terracotta jar
- a small vase or container - in this case an old small brown glass milk bottle

For conditioning the flowers - you'll also need:

- florists snippers or scissors
- a florist bucket

As always - condition the flowers by removing any leaves that would end up below the water line in the vase. Cut the stems at an angle - to increase water absorption. Put in a clean container with tepid water and leave in a cool place over night or at least a few hours before making the final arrangement.

Sorry, about always repeating this last bit - but it's probably the most important thing you can do to make your flowers last longer! So I'm afraid you have to put up with me always going on about it.


Start with the foliage and place it all around the edge of the vase. Then add the two different flowers - shorter around the edges and a bit longer in the middle - to make a soft domed shape. You don't want it too even - it looks more natural when the flowers are different heights. But this will probably happen naturally as the flowers are at different heights on the spray stems.

Make up a small arrangement with all the little off-cuts in the second little vase. 
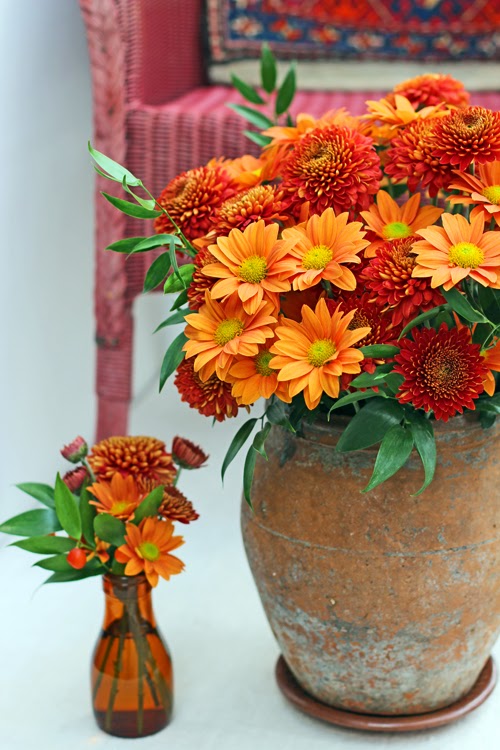
Start with the foliage and place it all around the edge of the vase. Then add the two different flowers - shorter around the edges and a bit longer in the middle - to make a soft domed shape. You don't want it too even - it looks more natural when the flowers are different heights. But this will probably happen naturally as the flowers are at different heights on the spray stems.

Make up a small arrangement with all the little off-cuts in the second little vase. 


I love all these orange, maroon and terracotta colours especially at this time of year. I have also played around with placing the arrangement next to a 1930's Lloyd Loom chair in similar colour - that has an ethnic weaving hanging over the back of it. I also found a small bowl and some beads in the same orange and maroon colours. 

I hope you will enjoy my new 'Take 3 Flowers' series - I'm looking forward to the challenge and it will be lots of fun! 


[Styling and photography © Ingrid Henningsson for Of Spring and Summer.]


10 November 2017

From the Archives - 24 November 2014 - Take 3 Flowers!


This is the second post in a brand new blog series - called 'From the Archives'. It will be previously posted blog posts that I feel are still relevant for some reason or another. 

It will always be a post from the same calendar month as we are in or it could be some of my favourite flowers from the same season - that still lifts my spirit. 

Flowers are so ephemeral - but their beauty caught on camera never fades.........!!


I'm back with another blog post in the series 'Take 3 Flowers!' - where I will show you how to make easy but beautiful and stylish flower arrangements - just using three different flowers. Often one of the three will be some kind of foliage.

Using just three flowers will sometimes be a challenge - but it will also keep the cost down. Cut flowers can be expensive but foliage on the other hand tends to be cheep. You can use lots of it to help fill out the arrangement and to provide support and structure for the other flowers.

Using flowers in closely related colours and then finding a vase or container in a similar colour can be a challenge - but boy what a pleasure when it works!

I love using Eucalyptus as foliage at this time of year and like here combined with a beautifully coloured Hydrangea and some dramatic dark berries - you don't need to add anything else. 

You'll need: 

- 1 stem of Hydrangea in a dark blue or purple colour - with a large flower head
-  5 stems of Viburnum berries
-  7 stems of small leaved Eucalyptus foliage - there is one called 'Baby Blue' that has small roundish leaves
- a large vase or container - in this case I have used a tall grey French vintage enamelled water jug


Here in the UK you can still buy Hydrangeas - mind you they are quite expensive - so I just picked one stem with a very large head in gorgeous green, purple and blue colours. 


A few stems of Viburnum, with dark blue almost black berries, will go a long way and I love the little red stems.


Eucalyptus is such an useful foliage, so I'm using it again - but this time one with a different size leaves - small and round. 

For conditioning the flowers - you'll also need:

- florists snippers or scissors
- a florist bucket

As always - condition the flowers by removing any leaves that would end up below the water line in the vase. Cut the stems at an angle - to increase water absorption. Put in a clean container with tepid water and leave in a cool, dark place over night or at least for a few hours before making the final arrangement.

Sorry, about always repeating this last bit - but it's probably the most important thing you can do to make your flowers last longer! So I'm afraid you have to put up with me always repeating myself.


Pick a large container in a colour relating to the flowers. Start off with the Hydrangea. It will have a woody stem so you will need to split the stem by making a second cut up the stem. Place it towards the front - resting on the edge of the container. 

The Viburnum berries will also have woody stems - so make that second cut up the stem on those as well. Place the berries behind the Hydrangea - a little bit taller than the Hydrangea - kind of framing the big flower. 

Lastly - trim and split the stems on the Eucalyptus, if the stems are thick and woody, and place them behind the dark berries - just kind of sticking up at the back and the sides - giving the whole arrangement a bit of movement. 


Some colouring pencils in relating colours - in a vintage pewter jar


It's such a pleasure to be able to work with beautiful plant materials and the beauty of Hydrangeas never ceases to amaze me and it will probably always be one of my favourite flowers.


~ xoxo ~

Ingrid


[Styling and photography © Ingrid Henningsson for Of Spring and Summer.]

6 April 2015

Take 3 Flowers! - # 8 - Tulips, Freesia and Eucalyptus


I'm back with another blog post in the series 'Take 3 Flowers!'

In this blog series I will show you how to make easy but beautiful and stylish flower arrangements - just using three different flowers. Often one of the three will be some kind of foliage.

Using just three flowers will sometimes be a challenge - but it will also keep the cost down. Cut flowers can be expensive but foliage on the other hand tends to be cheep - or at times you might even be able to get it from your own garden. You can use lots of it to help fill out the arrangement and to provide support and structure for the other flowers.

After all the yellow of Easter - I needed to work with a different colour - and when I found these deep dark pink tulips and pink Freesia - I knew I had the material for a colourful spring bouquet.


You'll need:

- 15 stems of colourful tulips
- 15 stems of Freesia in similar colour
- 7 stems of Eucalyptus parvifolia - a small leaved Eucalyptus
- a medium sized vase/container with a wide opening - in a neutral colour - in this case I have used a white vintage jar from Sweden
- small vase in same colour as the flowers
- a small white saucer 
- baker's twine and beads in matching colours


For conditioning the flowers - you'll also need:

- a pair of florists scissors
- a florist bucket filled with fresh water

Condition the flowers by removing any leaves that would end up below the water line in the vase. This is to reduce any growth of bacteria from deteriorating leaves. Also remove any broken or bruised leaves.

Cut the stems at an angle - this is to increase water absorption.  

Put in a clean container with fresh cool water and leave in a cool, dark place over night or at least for a few hours. This is to let the flowers absorb the maximum of water, before making the final arrangement.


You might have to re-cut the stems while making the final arrangement to suit the size of the vase or container and to get the right proportions.


Start off by putting the Eucalyptus foliage in the vase - evenly spread. Next put in the tulips - you can spread them evenly or group a few together to make several little focal points. Last the Freesias - use them to fill in any gaps. Cut the flowers at different heights so the bouquet has some movement - it's also nice to see the grey green foliage peek through here and there.

Make another arrangement in a small vase with the leftover foliage from the Eucalyptus - using a little vase in a matching colour to the flowers.

Also have some fun with baker's twine, a few beads and place it with the small arrangement on a little saucer - to make it feel a bit more 'special'.

Try to place the arrangement in a cool place during the nights and it will last a lot longer. Also remember that tulips continue to grow in the vase - so they will pop their heads above the other flowers over the next few days. 

I think it's always so lovely to see how an arrangement changes over time - new buds open, older flowers change colour and then fade - the life and beauty of flowers.


Have a Lovely Floral Monday!

See you later in the week!

~ xoxo ~

Ingrid


[Styling and photography © Ingrid Henningsson for Of Spring and Summer.]

16 February 2015

Take 3 Flowers! - # 7 - White Chrysanthemum, Eucalyptus and bear grass


White Chrysanthemums

I've put together another blog post in the series 'Take 3 Flowers!'

In this blog series I will show you how to make easy but beautiful and stylish flower arrangements - just using three different flowers. Often one or more of the three will be some kind of foliage.

Using just three flowers will sometimes be a challenge - but it will also keep the cost down. Cut flowers can be expensive but foliage on the other hand tends to be cheep. You can use lots of it to help fill out the arrangement and to provide support and structure for the other flowers.

After working with a lot of very strong colours lately - I thought it would be nice to use something a bit more neutral. So I have made an arrangement using almost all white Chrysanthemums with two foliage plants. One of them is Eucalyptus that has beautiful silver grey round leaves and the other is a very plain dark green grass called Bear grass.
  

White Chrysanthemums


You'll need: 

-  7 stems of white spray Chrysanthemums
-  3 stems of Eucalyptus 
- a very small hand-full of Xerophyllum - also called Bear grass
- a plain white vase - in this case I have used a white Alvar Alto vase
- 2 small plain vases to make little side arrangements

For conditioning the flowers - you'll also need:

- florists snippers or scissors
- a florist bucket

Condition the flowers by removing any leaves that would end up below the water line in the vase. This is to reduce any growth of bacteria from deteriorating leaves.

Cut the stems at an angle - to increase water absorption.  

Put in a clean container with tepid water and leave in a cool, dark place over night or at least for a few hours, to let the flowers absorb the maximum of water, before making the final arrangement.


You might also have to re-cut the stems while making the final arrangement to suit the size of the vase or container.

White Chrysanthemums

Start off with the Eucalyptus and arrange the branches along the edges of the container. Follow on with the Chrysanthemum also along the edges. Measure the flower stems against the side of the vase and estimate the height and where to make the final cut. Fill in with the final flowers in the middle. Last - pop in some of the grass throughout the arrangement to give it a bit of movement. 

White Chrysanthemums

Make two smaller arrangements with some of the left over flowers. Sometimes you have to cut the odd flower from low down on the stems and they are perfect to make small compact little arrangements to use next to the large arrangement or somewhere else in your home. 

White Chrysanthemums

As white is considered a neutral colour it will go with almost anything. So you can easily mix it with any green foliage - like here with silver-grey leaves; to mid green and dark green - as well as variegated leaves. If you have a garden - go out and see what you can find to use as foliage. Well, some of you might have to wait a little while if your garden is still covered with snow. Hopefully spring will soon arrive.....!

White Chrysanthemums


Have a Lovely Floral Monday!

See you later in the week!

~ xoxo ~

Ingrid


[Styling and photography © Ingrid Henningsson for Of Spring and Summer.]


2 February 2015

Take 3 Flowers! - # 6 - Red and Pink Roses with Green Foliage


Red and Pink Roses


I'm back with another blog post in the series 'Take 3 Flowers!'

In this blog series I will show you how to make easy but beautiful and stylish flower arrangements - just using three different flowers. Often one of the three will be some kind of foliage.

Using just three flowers will sometimes be a challenge - but it will also keep the cost down. Cut flowers can be expensive but foliage on the other hand tends to be cheep. You can use lots of it to help fill out the arrangement and to provide support and structure for the other flowers.

I'm using two different roses - a dark red one and a light pink one. Normally roses are not cheep - but these were being sold in big bunches of 10 and 20 roses in each for very little money. I was working on another project where I also needed roses so I went for it.

The foliage is light green variegated Pittosporum that grows in my garden - so all I had to do was to go out and cut a few branches. I use it all the time because it has a lovely green colour that goes well with a lot of different coloured flowers. 


Red and Pink Roses

You'll need: 

- 7 stems of dark red roses
- 5 stems of light pink roses
- 5 stems of Pittosporum tenuifolium 'Silver Queen'
- a re-cycled tin/can - washed and with the label removed

For conditioning the flowers - you'll also need:

- florists snippers or scissors
- a florist bucket

Condition the flowers by removing any leaves that would end up below the water line in the vase. This is to reduce any growth of bacteria from deteriorating leaves.

Cut the stems at an angle - to increase water absorption.  

Put in a clean container with tepid water and leave in a cool, dark place over night or at least for a few hours before making the final arrangement.

You might also have to re-cut the stems while making the final arrangement to suit the size of the vase or container.


Red and Pink Roses

I often find the roses you buy at this time of year a bit stiff and formal - I don't want to say that I don't like them - because I like most flowers - but I wanted to use them in a little bit of a different way.

So - I choose to use a regular old re-cycled tin or can as the Americans call them. I have left it plain but you could decorate it by painting it, using washi tape or tying ribbons, twine or raffia around it.  

Red and Pink Roses

Start off by putting in all the stems of the foliage evenly throughout the container. Measure the roses against the side of the tin before making the final cut and leave them just long enough to rest on the edge of the tin. 

Make a nice dome shaped arrangement with some of the flowers in the middle a bit longer and have the foliage weave their way between the roses and show above the roses to give some texture and height.  

Red and Pink Roses

I find the contrast fun and interesting - formal stiff roses and a bit of re-cycling or re-using something that most people throw away.

This could also be an early inspiration for Valentine's Day - because despite using an old tin - the arrangement has everything you want from a Valentine's arrangement - with its sweet and romantic red and pink roses and beautiful foliage.


Red and Pink Roses


Have a Lovely Floral Monday!

See you later in the week!

~ xoxo ~

Ingrid


[Styling and photography © Ingrid Henningsson for Of Spring and Summer.]


19 January 2015

Take 3 Flowers! - # 5 - Tulips and Hypericum


Tulips and Hypericum


I'm back with another blog post in the series 'Take 3 Flowers!'

Where I will show you how to make easy but beautiful and stylish flower arrangements - just using three different flowers. Often one of the three will be some kind of foliage.

Using just three flowers will sometimes be a challenge - but it will also keep the cost down. Cut flowers can be expensive but foliage on the other hand tends to be cheep. You can use lots of it to help fill out the arrangement and to provide support and structure for the other flowers.

I'm using three different red tulips - all within the red colour spectrum - and to that I have added Hypericum - that will supply both foliage and berries.

I know - I'm breaking the rules a little bit - it's 4 rather than just 3 flowers.  

To tell you the truth it was a special deal on the tulips - three bunches for the price of two and who can resist a special deal? I just thought: "The more the merrier...."

Tulips and Hypericum


You'll need: 

- 10 stems of dark red tulips
- 10 stems of red and orange tulips
- 10 stems of dark red parrot tulips
- 5 stems of Hypericum
- a vase or container in a contrasting or matching colour - in my case I have used a brown vintage pickling jar from the company Höganäs in Sweden

For conditioning the flowers - you'll also need:

- florists snippers or scissors
- a florist bucket

Condition the flowers by removing any leaves that would end up below the water line in the vase. This is to reduce any growth of bacteria from deteriorating leaves.

Cut the stems at an angle - to increase water absorption.  

Put in a clean container with tepid water and leave in a cool, dark place over night or at least for a few hours before making the final arrangement.

You might also have to re-cut the stems while making the final arrangement to suit the size of the vase or container.

Tulips and Hypericum

Start by arranging the Hypericum around the edge of the container - they will kind of embrace the tulips and make a nice edging. Then mix the three different tulips evenly in the middle - keep as many leaves as you possibly can on the tulips to make the arrangement look fuller.

The container I have used is a vintage pickling jar from my grandmother in Sweden. The dark shiny brown is a great contrast to all the red. I have surrounded the arrangement with some hessian fabric, some raffia, natural twine, pieces of wrinkly brown paper and a vintage wooden measuring stick. The red is picked up in some toy spades and a small garden fork. 


Tulips and Hypericum


Most tulips don't have very long stems - so if you want some height don't cut too much off the bottom. Keep them pretty even in height and make a nice slightly domed shape. 

Tulips do continue to grow in the vase - some more than others - so if you want the arrangement to continue looking the same you will have to trim the stems at the same time as you change the water in the vase. Or you can leave the tulips to do their own thing - both ways works - tulips are always beautiful whatever you do.

Tulips are looking really fresh right now and they are also very cheep - if it's the same where you live - just grab the opportunity to get some fabulous looking tulips and start making your own arrangements.

Tulips and Hypericum

Have a Lovely Floral Monday!

See you later in the week!

~ xoxo ~

Ingrid


[Styling and photography © Ingrid Henningsson for Of Spring and Summer.]

Related Posts Plugin for WordPress, Blogger...
