Showing posts with label From the Archives. Show all posts

11 January 2018

From the Archives - January 2016 - Pink Spring Flowers


This post is part of a new blog series called 'From the Archives'. It will be previously posted blog posts that I feel are still relevant for some reason or another. 

It will always be a post from the same calendar month as we are in or it could be some of my favourite flowers from the same season - that still lifts my spirit. 

Flowers are so ephemeral - but their beauty caught on camera never fades.........!!


It's a very pink bunch for the weekend this week - a bunch of pale pink tulips, some small pink gerbera, a bunch of bright pink ranunculus and some beautiful and very pink hyacinths.


As a vase I used a small vintage pickling jar - this one has a funny little strawberry and some lettering in the glass. It has tall straight sides and I also needed something that had a wide opening but that would hold the flowers in a compact shape.

I was also looking for something that would raise the arrangement off the table and I thought a pail of books would do the trick. On my bookshelves I found six books that all had pink spines to match the pink flowers.  


I also added a piece of chevron pink and white fabric, a small pink vase and a large vintage pink and green floral patterned bowl in the background.
  

 I have chosen flowers within a very tight colour palette - but the flowers are very different in size, shape and texture to still give a varied and interesting arrangement. 

It's such a pleasure and privilege to be able to have access to beautiful flowers at this time of year. A time of year when the weather is still dark, grey, cold and rainy even snow outside our windows - so what a treat to have flowers to arrange, style and photograph!


I hope this might have inspired you to find some flowers in a monochrome colour scheme and make an arrangement for the weekend.

Have a lovely floral weekend! 
xoxo Ingrid

15 December 2017

From the Archives - 29 December 2014 -Tiny Blooms - Cyclamens as Cut Flowers


This post is part of a brand new blog series called 'From the Archives'. It will be previously posted blog posts that I feel are still relevant for some reason or another. 

It will always be a post from the same calendar month as we are in or it could be some of my favourite flowers from the same season - that still lifts my spirit. 

Flowers are so ephemeral - but their beauty caught on camera never fades.........!!


This series of blog posts - called 'Tiny Blooms - are about small arrangements. Small - might be the size of the container or it could be the size of the flowers or the amount of stems in each container. It will also be that the arrangement is minimal both in presentation and that it's quick and easy to do. Apart from that there are no other strict rules - I'm allowing myself a lot of creative freedom!


Over the month of December I've been doing a few inspirational posts - that I've called 'Black and White Christmas' - and as it's still December - here is another one for the the New Year. 

Well, they are mostly white - with some black additions - and mixing contemporary elements with some vintage. 

As my 'tiny bloom' I have used yet again some white Cyclamen - but this time it's the smaller variety. But instead of displaying the whole pot with the flowers - I decided to use the cyclamens as a cut flower. 

I had earlier bought quite a few little pots with lots of cyclamen buds - I kept them outside and they very happily opened up its beautiful little flowers. 

So for this little project I cut about 30 stems and put them all in a little black vase.

As we are still in the holiday season - I added a Swedish vintage wooden toadstool, some plump cranberries and in the background I've displayed a mini Christmas tree.

All very quick and easy - the flowers last for about a week and if you plant the cyclamen in your garden - it will come back year after year.


Have a Lovely Floral Day!

I'll see you later in the week!

~ xoxo ~

Ingrid 


[Styling and Photography © Ingrid Henningsson for Of Spring and Summer.] 

8 December 2017

From the Archives - 26 December 2014 - A Bunch for the Weekend


This post is part of a brand new blog series called 'From the Archives'. It will be previously posted blog posts that I feel are still relevant for some reason or another. 


It will always be a post from the same calendar month as we are in or it could be some of my favourite flowers from the same season - that still lifts my spirit. 


Flowers are so ephemeral - but their beauty caught on camera never fades.........!!


This week on 'A Bunch for the Weekend' - I'm featuring a bit of an unusual plant as a cut flower and it's called Skimmia japonica 'Rubella'.

We have just passed the shortest day of the year and flowers in the garden are in short supply, flowers in the florist shop during the winter season often come from far away and can be expensive.

There are some lovely potted plants around at this time of year - such as Poinsettia, Cyclamen, Paperwhites, Hyacinths and Amaryllis.

All these flowers are lovely and delightful - but I have already used all of them at least once in the last months - so I decided to try something a little bit different this week. 

I'm using a low-growing evergreen shrub called Skimmia japonica 'Rubella' and both my local flower stall and greengrocer were selling it as a cut flower.  

It has short stems but has these clusters of little, round, tight flower buds in a deep, dark, red colour and it has thick oval dark green leaves.


You'll need:

- about 7 stems of Skimmia japonica 'Rubella' - they will all have 2-3 flower heads on each stem 
- a medium size vase or container in a neutral colour - I have used a vintage zinc container
- a jam jar to put inside the main container 
- 3 grey and 3 white tissue paper poms poms - in three different sizes
- 3 Kosta Boda glass Snowball votive lanterns with tea-lights


For conditioning the flowers - you'll also need:

- florists snippers or scissors
- a florist bucket


As always - you need to condition the flowers - remove all the lower leaves that would end up below the waterline in the vase. Cut the stems at an angle - to increase water absorption. Put in a clean container with fresh water and leave in a cool place over night or at least a few hours before making the final arrangement.

With woody stems you also need to make a vertical cut up the stem to increase the area for water absorption. 


The container I have used can not be trusted not to leak and I also don't want it to get any more rust - so I'm using a jam jar filled with water inside.

The Skimmia stems are not very long so the arrangement will be fairly low and wide. The side of the zinc container flares out so the flowers will sit very nicely in a loose and natural arrangement.

The red flowers sits perfectly against the grey zinc and the grey is also picked up in the grey pom poms in the background.    


The grey and white tissue paper pom poms are all piled up in one corner and I have positioned three Snowball candle holders at the other end - both round and a little festive to fit the season.


Have a Happy Floral Friday and a Great Weekend!

~ xoxo ~

Ingrid

[Styling and Photography © Ingrid Henningsson for Of Spring and Summer.]


1 December 2017

From the Archives - 7 December 2012 - Floral Feast


This post is part of a brand new blog series called 'From the Archives'. It will be previously posted blog posts that I feel are still relevant for some reason or another. 

It will always be a post from the same calendar month as we are in or it could be some of my favourite flowers from the same season - that still lifts my spirit. 

Flowers are so ephemeral - but their beauty caught on camera never fades.........!!


Inspired by the season and the fact that I wanted to use some red berries I came up with this very easy and very quick arrangement. 

My local florist, Achillea, always has inspiring displays outside as well as inside their shop and this time was no exception. I picked some Ilex with red berries and some berried ivy. I also said that they didn't need to wrap it up, but as I turned my back for thirty seconds she had it all wrapped up in brown paper and matched the berries with red raffia!


The Ilex verticillata that I chose is a holly that is also called Black alder or Winterberry. At this time of year there are some other twigs with fruit or berries that you can use, like crab apples or rose hips. 


The berried ivy is just normal ivy, but it's only mature ivy that has berries. I have plenty of ivy in my garden but it is clipped every year so it never reaches a mature state and therefore no berries. I love the colour and texture of the berries combined with the glossy pointed leaves.


Just like with all cut flowers you need to condition both the Ilex and the ivy. Remove any branches and leaves that will sit below the waterline and cut the stems at an angle. You will need a pair of secateurs to cut any woody stems and you should also split the stem at the bottom to increase the surface area, to help the plant absorb water. 


I have used a large clear glass vintage apothecary bottle, a small glass container, a red and white enamelled candle holder, red raffia, some small mostly red vintage Christmas baubles and a torn strip of black & white fabric with a pattern of snow crystals. 


I put the Ilex in the big bottle and tied the piece of fabric around the neck.


I arranged the ivy in the little bottle and twisted the raffia around the top.


The vintage enamelled candle holder is made by the Swedish company Kockums. I put a partly burnt candle in the holder, I didn't want it to be too tall, and arranged the little vintage baubles around it.


I am hoping to be able to inspire you with more seasonal and very easy floral arrangements every Friday for the next few months.  


[Photography and Styling by Ingrid Henningsson for ...Of Spring and Summer...]

24 November 2017

From the Archives - 27 October 2014 - Take 3 Flowers!


This post is part of a brand new blog series called 'From the Archives'. It will be previously posted blog posts that I feel are still relevant for some reason or another. 

It will always be a post from the same calendar month as we are in or it could be some of my favourite flowers from the same season - that still lifts my spirit. 

Flowers are so ephemeral - but their beauty caught on camera never fades.........!!


I'm starting a new series of blog posts called 'Take 3 Flowers' - I will show you how to make easy but beautiful and stylish flower arrangements - just using three different flowers. Sometimes one of the three will be some kind of foliage.

Using just three flowers will sometimes be a challenge - but it will also keep the cost down. Cut flowers can be expensive and foliage on the other hand tends to be cheap. You can use lots of it to help fill out the arrangement and to provide support for the other flowers. If you have a garden or access to one you can probably find some foliage to use from there.


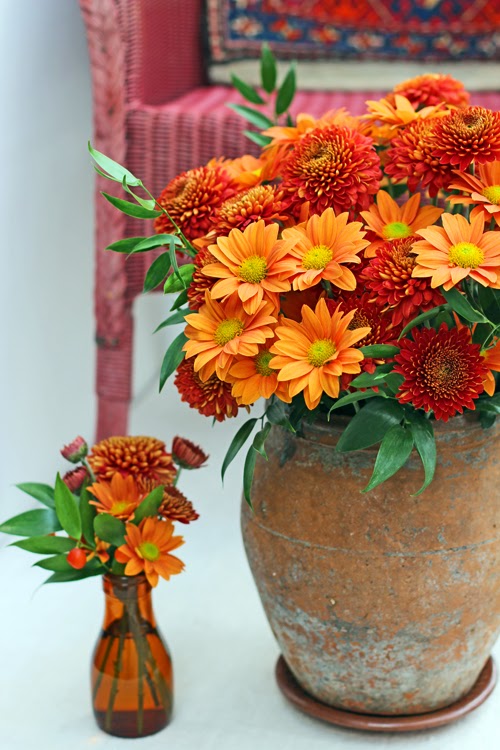
In this first one - I'm using two different Chrysanthemums - they are both what's called 'spray' - that means that towards the top are several smaller stems with one flower on each stem. 


The light orange one has single daisy type flowers with a lighter centre. 


The other one has a light maroon colour and picks up the lighter colour on the back of its petals.


The green foliage that I've used is called soft Ruscus. Used a lot by florists and quite easy to find. But really any small- leaved green foliage would do. 

If you are in luck the Ruscus might have some of its bright orange berries - as an extra little bonus. 


You'll need: 

- 10 stems of Chrysanthemums in two different colours
- 5 stems of soft Ruscus or similar green foliage
- a fairly large vase or container - in this case I have used a large vintage terracotta jar
- a small vase or container - in this case an old small brown glass milk bottle

For conditioning the flowers - you'll also need:

- florists snippers or scissors
- a florist bucket

As always - condition the flowers by removing any leaves that would end up below the water line in the vase. Cut the stems at an angle - to increase water absorption. Put in a clean container with tepid water and leave in a cool place over night or at least a few hours before making the final arrangement.

Sorry, about always repeating this last bit - but it's probably the most important thing you can do to make your flowers last longer! So I'm afraid you have to put up with me always going on about it.


Start with the foliage and place it all around the edge of the vase. Then add the two different flowers - shorter around the edges and a bit longer in the middle - to make a soft domed shape. You don't want it too even - it looks more natural when the flowers are different heights. But this will probably happen naturally as the flowers are at different heights on the spray stems.

Make up a small arrangement with all the little off-cuts in the second little vase. 


I love all these orange, maroon and terracotta colours especially at this time of year. I have also played around with placing the arrangement next to a 1930's Lloyd Loom chair in similar colour - that has an ethnic weaving hanging over the back of it. I also found a small bowl and some beads in the same orange and maroon colours. 

I hope you will enjoy my new 'Take 3 Flowers' series - I'm looking forward to the challenge and it will be lots of fun! 


[Styling and photography © Ingrid Henningsson for Of Spring and Summer.]


17 November 2017

From the Archives - 18 November 2015 - Tiny Blooms - Pink Chrysanthemums


Here is another post in a brand new blog series - called 'From the Archives'. These will be previously posted blog posts that I feel are still relevant for some reason or another. 

It will always be a post from the same calendar month as we are in or it could be some of my favourite flowers from the same season, that still lifts my spirit. 

Flowers are so ephemeral - but their beauty caught on camera never fades.........!!


This series of blog posts - called 'Tiny Blooms - are about small flower arrangements. Small - might be the size of the container or it could be the size of the flowers or the amount of stems in each container. It can also be that the arrangement is minimal both in presentation and that it's simple, quick and easy to do. Apart from that there are no other strict rules - I'm allowing myself a lot of creative freedom!


Chrysanthemums, pink and vintage bottles - some of my favorite things!

I found some pink spray Chrysanthemums - 'spray' just means that they are multi-stemmed - and I cut some stems down to their single flowers. 

My daughter and I spent a few hours at the Country Living magazine Christmas Fair last week. There are some lovely stalls that I go back to every year. On one antique stall I found these adorable mini vintage bottles - bought five and I had an instant little collection.


Combining the two makes a charming display - the bottles are only just over 11 cm tall - so they are perfect for one or two stems.

To photograph them I have displayed them on an old French linen tablecloth - but a small collection like this works very well on a little tray - keeping them together gives them more impact.

Chrysanthemums are available all year around but are particularly welcome at this time of year when cheep flowers are sparse on the ground. Here in London its raining, its dark early and very windy. Well, the pink colour reminds me of spring!!

[Styling and Photography: © Ingrid Henningsson/Of Spring and Summer.]


10 November 2017

From the Archives - 24 November 2014 - Take 3 Flowers!


This is the second post in a brand new blog series - called 'From the Archives'. It will be previously posted blog posts that I feel are still relevant for some reason or another. 

It will always be a post from the same calendar month as we are in or it could be some of my favourite flowers from the same season - that still lifts my spirit. 

Flowers are so ephemeral - but their beauty caught on camera never fades.........!!


I'm back with another blog post in the series 'Take 3 Flowers!' - where I will show you how to make easy but beautiful and stylish flower arrangements - just using three different flowers. Often one of the three will be some kind of foliage.

Using just three flowers will sometimes be a challenge - but it will also keep the cost down. Cut flowers can be expensive but foliage on the other hand tends to be cheep. You can use lots of it to help fill out the arrangement and to provide support and structure for the other flowers.

Using flowers in closely related colours and then finding a vase or container in a similar colour can be a challenge - but boy what a pleasure when it works!

I love using Eucalyptus as foliage at this time of year and like here combined with a beautifully coloured Hydrangea and some dramatic dark berries - you don't need to add anything else. 

You'll need: 

- 1 stem of Hydrangea in a dark blue or purple colour - with a large flower head
-  5 stems of Viburnum berries
-  7 stems of small leaved Eucalyptus foliage - there is one called 'Baby Blue' that has small roundish leaves
- a large vase or container - in this case I have used a tall grey French vintage enamelled water jug


Here in the UK you can still buy Hydrangeas - mind you they are quite expensive - so I just picked one stem with a very large head in gorgeous green, purple and blue colours. 


A few stems of Viburnum, with dark blue almost black berries, will go a long way and I love the little red stems.


Eucalyptus is such an useful foliage, so I'm using it again - but this time one with a different size leaves - small and round. 

For conditioning the flowers - you'll also need:

- florists snippers or scissors
- a florist bucket

As always - condition the flowers by removing any leaves that would end up below the water line in the vase. Cut the stems at an angle - to increase water absorption. Put in a clean container with tepid water and leave in a cool, dark place over night or at least for a few hours before making the final arrangement.

Sorry, about always repeating this last bit - but it's probably the most important thing you can do to make your flowers last longer! So I'm afraid you have to put up with me always repeating myself.


Pick a large container in a colour relating to the flowers. Start off with the Hydrangea. It will have a woody stem so you will need to split the stem by making a second cut up the stem. Place it towards the front - resting on the edge of the container. 

The Viburnum berries will also have woody stems - so make that second cut up the stem on those as well. Place the berries behind the Hydrangea - a little bit taller than the Hydrangea - kind of framing the big flower. 

Lastly - trim and split the stems on the Eucalyptus, if the stems are thick and woody, and place them behind the dark berries - just kind of sticking up at the back and the sides - giving the whole arrangement a bit of movement. 


Some colouring pencils in relating colours - in a vintage pewter jar


It's such a pleasure to be able to work with beautiful plant materials and the beauty of Hydrangeas never ceases to amaze me and it will probably always be one of my favourite flowers.


~ xoxo ~

Ingrid


[Styling and photography © Ingrid Henningsson for Of Spring and Summer.]

3 November 2017

From the Archives - 3 November 2014 - Ornamental Cabbage


A blogpost from deep in the archives - posted last time also on 3 November - still just as relevant as it's seasonal and one of my favourite autumn flowers/plants.

It was also the beginning of a new and very popular blog series called 'Tiny Blooms'.  


***** 

I'm starting another blog series or column - that I'm calling 'Tiny Blooms' and it will be about small arrangements. Small or tiny might be the size of the container or it could be the size of the flowers or the amount of stems in each container. It will also be that the arrangement is minimal both in presentation and that it's quick and easy to do. Apart from that there are no other strict rules - I'm allowing myself some creative freedom here!


In this the first 'Tiny Blooms' - I'm diving straight in and almost breaking some of the rules. 

I'm using some rather long-stemmed ornamental cabbage - you should have seen them before I got hold of them, they were twice as tall - BUT there are only three of them.

I have also reduced the flower head taking off the greener outer leaves and just leaving the really stunningly colourful ones in the centre. I also love the amazing colour on the stems and wanted to show part of them.


So after conditioning the flowers - I reduced the heads by taking off a lot of the lower leaves - I trimmed the stems so that they are in proportion to the container - and in this case allowing for some of the beautiful stems to show - rather then having the flower heads rest on the edge of the container - as you probably normally would do.

I tried to tie some purple raffia around the stems - to hold the three stems together - but in the end decided that it didn't work - the heads looked too squashed together - instead I just let the three stems lean to one side. I didn't want a stiff arrangement and as I said before I wanted to show the stems. 

I changed from purple raffia to black twine and tied some around the neck of the cream ware container - just with a double knot and leaving the ends to casually hang down. 

Voilà - a seasonal, quick and easy arrangement - using some colourful 'tiny blooms'.


  Have a Lovely Floral Day!

~ xoxo ~

Ingrid 

[Styling and Photography © Ingrid Henningsson for Of Spring and Summer.] 


Related Posts Plugin for WordPress, Blogger...