Showing posts with label Flower Scissors. Show all posts

19 April 2017

Behind the Scene - # 2 - Styling White Stock Flowers


Buying flowers is an investment - so my aim is to use the same bunch of flowers for several different photo shoots. It doesn't always work out - flowers wilt too quickly often caused by drastic changes in the outdoor temperature. I always keep my flowers outside during the night. 


Here I have used the same white stock flowers as in the last 'Behind the Scene'.

They were already conditioned so I didn't have to remove any lower leaves or cut any of the stems - as I was just going to show the bunch lying on a table on a unbleached natural linen fabric. 


All I did was to make a hand-tied bunch and then I tied the stems with a natural twine - simple and easy. The natural twine works well with the simplicity of the white flowers.


Staying with the natural theme you could wrap the flowers in plain brown paper and they could then be given as a gift - or you could just snip the stems and put the flowers in a vase or container.

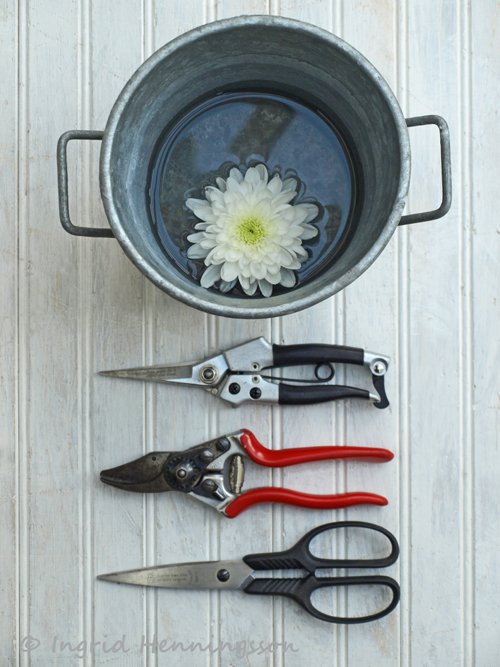
In the last image I have changed the scissors to one a bit more aesthetically pleasing - just because I wanted to!

A simple and easy theme: White flowers - natural twine - on a vintage washed French linen cloth.


Enjoy your flower arranging and have a fabulous and floral Wednesday!

Thank you for visiting 'Of Spring and Summer' - I look forward to seeing you later in the week - when I'll be back with more floral delights.

Ingrid 

~ xoxo ~

[Flowers: White stock flowers - bought from my favourite street flower stall in North West London.]

[Props: Natural linen fabrics, natural twine, flower scissors as well as a pair of Japanese style flower scissors; made in China - from stylists own prop collection.]

[Styling, photography and text © Ingrid Henningsson/Of Spring and Summer.]


*****
P. S. Did you know that you can subscribe to receive a notification via email whenever I have a new blog post. Just fill in your email address at the top of my blog on the right.

*****
P. S. If you are looking for more floral inspiration you can go over and have a look at my Pinterest boards. I now have just over 12 000 followers and around 200 boards all relating to flowers, flower styling and flower arranging. There are boards on individual flowers and shows how to arrange them. Other boards show different ways of using vases and containers. Simply click on the link below and it will take you straight there.

18 January 2017

Arrange Your Flowers! - Basic Tools for Flower Arranging


Before we know it spring will be here and with spring comes lots of spring flowers.

I have decided to relaunch my series of posts called 'Arrange your Flowers!' - so that we can be ready and know what to do with all those beautiful and stunning flowers. 

Some of what you read you will have come across before. There is very little new in the flower arranging world - apart from all the creativity we can all add to our flower arranging.

But I do have some exciting news to tell you about - since I last wrote on 'Arrange Your Flowers!' - I have trained in floristry and that will be very useful while writing these blog posts.

It makes me very happy to be able to pass on all the inside tips and tricks from the florist world. 

So this is all about arranging your own flowers - it will have do-it-yourself flower arranging ideas, tips and advice. All the advice will be very easy to follow - even if you've never done any flower arranging before. 

It will be very basic and very down to earth.

So let's start from the beginning!


These are the most basic but essential tools that you need to start doing your own flower arranging:

1. A couple of different size containers - they can be plastic or metal. Nothing fancy, it's just a container to put the flowers in after you've conditioned them. Traditionally florists flower buckets were metal - mostly zinc but now they tend to be plastic.

Also remember to keep your containers scrupulously clean! 


2. A pair of floral snippers or floral scissors - like the black handled scissors and snippers in the second image and the bottom image. Buy a pair that is comfortable to use and that will not hurt your hand - if you are using them for a long time. 

It's quite useful to have both a pair of snippers and a pair of scissors. The scissors will be useful to cut elastic bands around the flower stems and for cutting the cellophane that the flowers come wrapped in - it's easier to do that with a pair of scissors. Floral scissors or florist's scissors are a bit more sturdy and have stronger blades than a normal pair of scissors - so are also excellent, if sharp, to cut flower stems. 

In the end it's a personal choice and what you are the most comfortable using.


3. You will also need a pair of secateurs or pruners for cutting thicker stems or branches - like the red handled secateurs in the second image. If you don't already own a pair - get a good quality one - as they usually last a lifetime. 

I hope all my tips will be useful and easy to follow and that they will help to keep your flowers looking good and last longer.

Have a Creative Floral Day!

~ xoxo ~

Ingrid


Thank you for visiting 'Of Spring and Summer' - I will be back later in the week with more floral delights.


[Styling and photography © Ingrid Henningsson/Of Spring and Summer.]

P. S. Did you know that you can subscribe to receive a notification via email whenever I have a new blog post. Just fill in your email address at the top of my blog on the right.

*****
P. S. If you are looking for more floral inspiration you can go over and have a look at my Pinterest boards. I have just over 200 boards all relating to flowers, floral styling and flower arranging. There are boards on individual flowers and shows how to arrange them. Other boards show different ways of using vases and containers. Simply click on the link below and it will take you straight there.

24 September 2014

Arrange Your Flowers! - # 2 - How To Keep Your Cut Flower Tools Clean and Sharp


This is the second instalment of 'Arrange Your Flowers!' - and it's all about keeping your flower buckets and vases free from bacteria and how to keep your tools clean and sharp.

1. It's very important to keep your vases and containers scrupulously clean. Always clean the containers you use when conditioning your flowers after each use. 

After every time you discard a bunch of flowers give the used vase a good clean. Cut flowers start to decay as soon as they are cut and any decaying stems in the vase produces bacteria. Any build-up of bacteria in the vase will further shorten the life and increase the deterioration of the flowers.

If you live in an area with hard water - calcium deposits will also build up on the inside of the vases and leave white or light-brown powdery or scaly deposits. With very stubborn stains you might have to use some kind of scouring pad or very fine steel wool. Just go gently and make sure you don't scratch that old crystal vase! 

2. Hot soapy water and a bit of scrubbing is usually all you need to do. Use a dish brush for any larger vases or the flower buckets. For smaller vases with narrow necks use a bottle brush.

You can also buy tubs of little copper beads that you swirl around with water. They will remove any build-up of stains in hard to reach places. The beads are reusable so clean, dry and store them for next time.

You are often given the advice to use bleach for cleaning vases. I don't use bleach - its not environmentally friendly and there are too many questions surrounding it's usage and what it does to the environment and our health. 


3. Another important thing is to keep your cutting tools clean and sharp.

Just like with containers and vases - grime, dirt and bacteria will build up on your scissors, snippers and secateurs. They get sticky from the sap in the flower stems and leaves; and will eventually develop a brown residue on the blades. You will have to clean this of with hot soapy water - you can use the same dish brush that you use for cleaning your vases and containers. You might sometimes have to go over the blades with some steel wool. After washing and drying - wipe the blade with some oil to prevent any rust and to keep it working smoothly.

4. Sharpen your tools on a regular bases. The sharper they are the cleaner the cut. It's very important that you don't crush the stems. A crushed stem means that less water will be absorbed by the stems and transported to the flowers and leaves - and will result in your flowers not lasting as long.

There are all kinds of sharpening tools out there to buy or you might already have a steel for sharpening your kitchen knives. It's not too difficult to learn how to sharpen a pair of scissors or snippers - it just takes a little practice. After sharpening you should wipe the blades with some oil to prevent rusting.

Here is a link to the first 'Arrange Your Flowers!' - # 1 - Essential Tools for Cut Flowers.

I'll be back next month with more advice on how to 'Arrange Your Flowers!'. 

Have a Creative Floral Day!

~ xoxo ~

Ingrid


[Styling and photography © Ingrid Henningsson for Of Spring and Summer.]

3 September 2014

Arrange Your Flowers! - # 1 - Essential Tools for Cut Flowers


This is a new series of blog posts called 'Arrange Your Flowers! and I'll be posting them on a regular basis.

It's all about arranging your own flowers - it will have do-it-yourself flower arranging ideas, tips and advice - and will be very easy to follow - even if you've never done any flower arranging before. 

It will be very basic and very down to earth.

So let's start from the beginning!

These are the most basic but essential tools that you need to start doing your own flower arranging:

1. A couple of different size containers - they can be plastic or metal. Nothing fancy, it's just a container to put the flowers in after you've conditioned them. Traditionally florists flower buckets were metal - mostly zinc but now they tend to be plastic. 

2. A pair of floral snippers or floral scissors - like the black handled scissors and snippers in the image . Buy a pair that is comfortable to use and that will not hurt your hand - if you are using them for a long time. 

It's quite useful to have both a pair of snippers and a pair of scissors. The scissors will be useful to cut elastic bands around the flower stems and for cutting the cellophane that the flowers come wrapped in - it's easier to do that with a pair of scissors. Floral scissors or florists' scissors are a bit more sturdy and have stronger blades than a normal pair of scissors - so are also excellent for cutting flower stems. 

In the end it's a personal choice and what you are the most comfortable using. 

3. You will also need a pair of secateurs or pruners for cutting thicker stems or branches - like the red handled secateurs in the image. If you don't already own a pair - get a good quality one - as they usually last a lifetime. 

I hope all my tips will be useful and easy to follow and that they will help to keep your flowers looking good and last longer.

Have a Creative Floral Day!

~ xoxo ~

Ingrid

[Styling and photography © Ingrid Henningsson for Of Spring and Summer.]


Related Posts Plugin for WordPress, Blogger...