Showing posts with label Arrange Your Flowers!. Show all posts

1 March 2017

Arrange Your Flowers! - Top 3 Cutting Tools for Flower Arranging


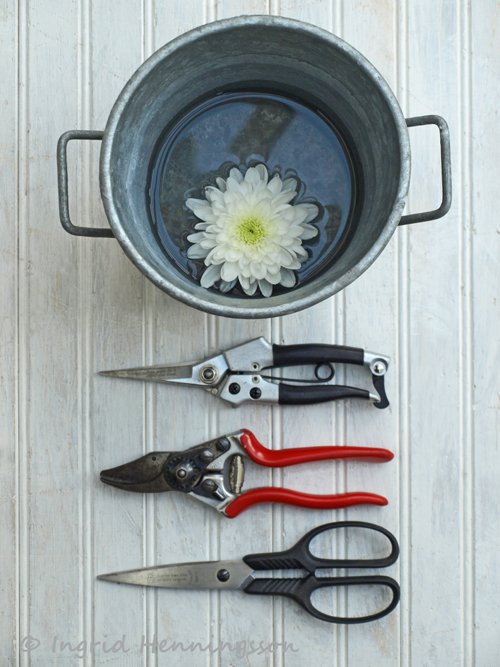
This time on 'Arrange Your Flowers!' I'm very excited to tell you about my top three cutting tools that I use for flower arranging. 

One in particular that I have only starting using during the last year. It's a Japanese flower scissors from Sakagen - even though it's top on my list - it's featured last in this blog post.

During my training in floristry I learnt so much, not only about flowers but also about the different tools you use. So here are my three favourite ones that I could not be without!


From left to right:
1. A sturdy pair of scissors
2. A pair of florist scissors
3. A pair of secateurs

The Japanese florist scissors and the secateurs will be an investment - BUT it is so worth it - especially if flower arranging is something you will be doing a lot of.

I will describe in more detail below why you are going to need all three.


A pair of secateurs is invaluable for cutting thick and woody stems. Branches that are too thick for the florist scissors to deal with. It will also be a lot kinder to your hands as you will not need to use as much force while cutting. 

As I said before they are an investment but if you look after them they will last a lifetime. The pair above is from Felco and comes in many different styles and sizes depending on how you are going to use them and what size hands you have. I have had this pair for twenty years and it's still the best I've ever used.


A sturdy pair of scissors is also invaluable to have available for cutting wrapping paper, cellophane, rubber bands and anything else that pops up in flower arranging.

They will quickly go blunt so stay away from cutting flower stems. The one I have has stainless steel blades - so it doesn't rust.


Last but not least a few words about these Japanese flower scissors that quite recently came into my floral world. It's the best cutting tool I have ever used. It's light, very sharp and it doesn't crush the stems but makes a clean cut. It's also very comfortable to handle with slightly padded handles so it won't hurt your hands if do a lot of cutting.

There are a few different brands that are almost identical. This particular one that I have is a brand called Sakagen and you can buy it on the internet.

So far I have been very happy with it and I hope that will continue. I do have one word of warning - they are extremely sharp so you will always have to be very careful!    

*****
This is only the second blog post since I relaunched this monthly series of blog posts called 'Arrange Your Flowers! 

Here is a link to the first post in the series that I started back in 2014. The first one was called 'Essential Tools for Cut Flowers' also showing a few other things that I use in my flower arranging . 


Enjoy your flower arranging and have a fabulous and floral Wednesday!

Thank you for visiting 'Of Spring and Summer' - I look forward to seeing you on Friday - when I'll be back with another 'A Bunch for the Weekend'. The bunch you buy just to lift the spirit and to have something pretty to look at over the weekend.

Ingrid 

~ xoxo ~

[Styling, photography and text © Ingrid Henningsson/Of Spring and Summer.]
*****
P. S. Did you know that you can subscribe to receive a notification via email whenever I have a new blog post. Just fill in your email address at the top of my blog on the right.

*****
P. S. If you are looking for more floral inspiration you can go over and have a look at my Pinterest boards. I now have just over 12 000 followers and around 200 boards all relating to flowers, flower styling and flower arranging. There are boards on individual flowers and shows how to arrange them. Other boards show different ways of using vases and containers. Simply click on the link below and it will take you straight there.

18 January 2017

Arrange Your Flowers! - Basic Tools for Flower Arranging


Before we know it spring will be here and with spring comes lots of spring flowers.

I have decided to relaunch my series of posts called 'Arrange your Flowers!' - so that we can be ready and know what to do with all those beautiful and stunning flowers. 

Some of what you read you will have come across before. There is very little new in the flower arranging world - apart from all the creativity we can all add to our flower arranging.

But I do have some exciting news to tell you about - since I last wrote on 'Arrange Your Flowers!' - I have trained in floristry and that will be very useful while writing these blog posts.

It makes me very happy to be able to pass on all the inside tips and tricks from the florist world. 

So this is all about arranging your own flowers - it will have do-it-yourself flower arranging ideas, tips and advice. All the advice will be very easy to follow - even if you've never done any flower arranging before. 

It will be very basic and very down to earth.

So let's start from the beginning!


These are the most basic but essential tools that you need to start doing your own flower arranging:

1. A couple of different size containers - they can be plastic or metal. Nothing fancy, it's just a container to put the flowers in after you've conditioned them. Traditionally florists flower buckets were metal - mostly zinc but now they tend to be plastic.

Also remember to keep your containers scrupulously clean! 


2. A pair of floral snippers or floral scissors - like the black handled scissors and snippers in the second image and the bottom image. Buy a pair that is comfortable to use and that will not hurt your hand - if you are using them for a long time. 

It's quite useful to have both a pair of snippers and a pair of scissors. The scissors will be useful to cut elastic bands around the flower stems and for cutting the cellophane that the flowers come wrapped in - it's easier to do that with a pair of scissors. Floral scissors or florist's scissors are a bit more sturdy and have stronger blades than a normal pair of scissors - so are also excellent, if sharp, to cut flower stems. 

In the end it's a personal choice and what you are the most comfortable using.


3. You will also need a pair of secateurs or pruners for cutting thicker stems or branches - like the red handled secateurs in the second image. If you don't already own a pair - get a good quality one - as they usually last a lifetime. 

I hope all my tips will be useful and easy to follow and that they will help to keep your flowers looking good and last longer.

Have a Creative Floral Day!

~ xoxo ~

Ingrid


Thank you for visiting 'Of Spring and Summer' - I will be back later in the week with more floral delights.


[Styling and photography © Ingrid Henningsson/Of Spring and Summer.]

P. S. Did you know that you can subscribe to receive a notification via email whenever I have a new blog post. Just fill in your email address at the top of my blog on the right.

*****
P. S. If you are looking for more floral inspiration you can go over and have a look at my Pinterest boards. I have just over 200 boards all relating to flowers, floral styling and flower arranging. There are boards on individual flowers and shows how to arrange them. Other boards show different ways of using vases and containers. Simply click on the link below and it will take you straight there.

26 November 2014

Arrange Your Flowers! - # 6 - 12 Favourite Flower Arranging Books


Here are 12 of my favourite flower arranging and floral styling books.

The first four are all a bit cutting edge when it comes to flower arranging - some are modern and contemporary in style others are more romantic and incorporating lots of vintage containers.


Vintage Flowers (2011) this is the London florist Vic Brotherson's first book - choosing, arranging and displaying lush arrangements in vintage containers. Vic's very funky flower shop Scarlet and Violetbased in north west London, is full of vintage vases and containers. 
Here is my book review of her book. 

Vintage Wedding Flowers (2014) also by Vic Brotherson - romantic and beautiful summer arrangements - but not just for weddings. Vic did the very romantic wedding flowers for the model Kate Moss's wedding in 2011. 

Decorate with Flowers (2014) by Holly Becker - who writes the blog Decor8 and Leslie Shewring - who writes the blog A Creative Mint - creative ideas for flowers and containers and how to place them around the home. 
Here is my book review of their book. 

Flower Power (2007) by Swedish florist Malin Hidesäter and photographer Anna Skoog - bouquets and simple arrangements. Malin now works with Blomsterfrämjandet, who promotes cut flowers and house plants in Sweden. Blomsterfrämjandet do yearly trend reports that are worth having a look at - it's in Swedish - so you will have to do a translation.


The next four are all about how to bring nature indoors and making very natural and seasonal arrangements.

A Year in Flowers (2012) by Shane Connolly - seasonal flowers arranged in very natural and unfussy ways. Shane was the Artistic Director for all the floral arrangements at the Royal Wedding in 2011 for the Duchess of Cambridge. 

Bringing Nature Home (2012) by Ngoc Minh Ngo - floral arrangements inspired by nature. Arrangements by Nicolette Camille of the Brooklyn based Little Flower School
Here is my book review of the book. 

The Flower Recipe Book (2013) by Alathea Harampolis and Jill Rizzo - 100 easy-to-create arrangements set out as recipes - like a cookbook. They are the founders of Studio Choo, a San Francisco based floral design studio. 
Here is my book review of their book. 

Inspire - The Art of Living with Nature (2014) by Willow Crossley - 50 projects to bring the outside in. Willow shows you how to decorate your home using flowers, foliage and foraged finds. This is Willow's second book, her first was called The Art of Handmade Living (2012). 


The last four books are more about traditional flower arranging - all written by well established florists in the UK and America. 

At Home with Flowers (2011) by Jane Packer - beautifully simple arrangements for every room in the house. Jane's last book and I think her best. 
Here is my book review of her book.


Flowers Chic and Cheap (2010) by New York florist Carlos Mota - arrangements with flowers picked from the market or backyard.

Flowers Every Day (2012) by Paula Pryke - creative ideas for simple, modern flowers for your home. Paula mixes bought flowers with flowers from her garden. 
Here is my book review of her book. 

Simple Flower Arranging (2014) by Mark Welford and Stephen Wicks - Step-by-Step Design and Techniques. Sixty stylish arrangements - bouquets, small vases and table centrepieces.Their shop Bloomsbury Flowers is in Covent Garden and they have now opened a second location in Ham Yard also in the middle of London.


Have a Lovely Floral Day!

I will be back with more 'Arrange Your Flowers!' in January - in the meantime I'll see you on Friday with another 'A Bunch for the Weekend'.

~ xoxo ~

Ingrid


[Styling and photography © Ingrid Henningsson for Of Spring and Summer.]


12 November 2014

Arrange Your Flowers! - # 5 - How To Choose Your Cut Flowers


This is the fifth in my Do-It-Yourself series of 'Arrange Your Flowers!' - and it's about how to choose your cut flowers and what to look out for when you want to buy some pretty flowers for your home. 

If you have been following my blog posts for a while you might recognise some of this because I have written about it before - but this is a revised and updated version - so bear with me and stay tuned!


1. 

There are many factors involved when choosing and buying flowers for your home. So think colour, size and budget - as well as why, where, what and when.

Why?

Are you buying flowers to decorate a dining table for a dinner party or maybe you are buying flowers for someone special? Is it flowers for the weekend to go on a table in your living room or maybe just flower for you because you feel like it and you saw some in the supermarket on your way home from work?


Where? 

Where are you going to put the flowers? What room? If you are having guests it's always nice to have flowers in the hallway to welcome your guests - but its also nice to see some flowers when you come home after a long day. 

A vase of seasonal flowers on the dining or kitchen table will make it a treat to sit down to eat or have a cup of tea - even if its just for you.

Little arrangements in the bedroom or bathroom makes those rooms feel more special. Just make sure your guests don't have hayfever! 

You might want to think about exactly where you are going to to place the flowers. Are you looking for flowers that will go with a particular colour scheme? Also think about what colour vase or container you are going to use. 


What?

What are you looking for? Is it a special look or you don't mind so much what it is as long as the flowers are fresh, pretty and has lots of colour.

Consider the size of the arrangement - are you thinking big and bold or small and dainty? Big is probably more suited for a hallway, if you have the space, or a livingroom. A smaller arrangement looks perfect in a bedroom.

If its for the middle of a dinner table think about the height of the arrangement. You guests should be able to see each other across the table in order to chat. Also avoid strongly scented flowers for a dinner table - their scent can compete with the aroma of the food.  

For large arrangement you need large vases and containers - and you need a large budget - unless you live in the country and have your own cutting garden.

Your budget is important - cut flowers can be expensive. Buying a few stems of something really special and adding lots of green foliage will be one way to cut cost. 

Remember when buying flowers from a florist - the longer the stem the more expensive - so long stemmed roses will always cost a lot of money.


When?

Buying flowers that are in season is also a way to cut cost. Out of season flowers will have been flown in from far away - probably had a stopover in Holland before being distributed throughout Europe. In America a lot of flowers come from countries in South America like Colombia and Ecuador. 

Farmers' markets is one way to buy seasonal flowers at a reasonable price. Yes, the choice of flowers will be more limited and they will only be available during certain times of the year - but you know that they are grown by local farmers and therefore not travelled very far.


2.

When you buy cut flowers - have a good look at the flowers - just to make sure they are in good condition. 

Take your time - don't be rushed to make up your mind about what flowers, what colours and how many stems. If they are already in bunches wrapped in cellophane - look at the bottom of the stems  - and avoid any that has started going brown. 

Look for straight stems, fresh green leaves  - avoid any flowers with wilted, yellow or brown leaves or flowers that are shedding their petals. Also avoid flowers with floppy heads or petals that are starting to go brown at the edges.

Look for flowers with stems that are still in bud - and the buds should show the colour of the petals just breaking through.

There are some flowers that you should avoid buying when only in tight green buds such as peonies, poppies, roses, dahlias and irises as they will probably never open. 

Avoid flowers that has started shedding their pollen - loose pollen is a sure sign that the flowers are nearing the end of their life.

Ensure the flowers are well wrapped for the journey home. It will protect them from any fluctuating temperatures.

Arriving home with your flowers remove the wrapping as soon as you get home to prevent any build-up of condensation. Also remove any ties or elastic bands and make sure you condition the flowers - as they will need to be put in water as soon as possible.


***********

Here are links to previous 'Arrange Your Flowers!'


Have a Creative Floral Day!

~ xoxo ~

Ingrid

[Styling and photography © Ingrid Henningsson for Of Spring and Summer.]


22 October 2014

Arrange Your Flowers! - # 4 - How To Make Your Cut Flowers Last Longer


This is the fourth instalment of 'Arrange your Flowers' - and it's about how to take care of your flowers - once you have conditioned them and made your arrangement at home.

I have written about this before - but this time I have revised and added lots of new information. 

So bear with me - because this is good stuff and all these tips will make your flowers last much longer!

1. Change the water in the vase every couple of days. The stems will start to deteriorate as soon as they are cut and all the stems sitting in water will speed up this process. Changing the water frequently will remove the build up of bacteria in the vase and your flowers will last longer.

Also try to re-cut the stems when you change the water. Stems can become blocked with bacteria and reduce their ability to absorb water. By making a fresh cut you will give the flower a freshly cut area that will make it able to better absorb water and therefore prolong the life of the flower. This might not always be practical - you don't want the arrangement to fall apart and you don't want the stems to end up looking too short in the vase. But it's a very good idea if you are able to do it.

While you are changing water and re-cutting stems also remove any dying flower heads or wilting leaves. Please, see point number 4 below for the reason behind this. 

A very useful trick if you have a large arrangement or you don't want to take the arrangement out of the vase - is to put the whole arrangement - vase and all in the sink under the running tap and let the water run clear.

You have to be able to pick up the vase - it might be very heavy when full of flowers and water, the sink has to be deep enough for the vase to fit under the tap and you have to dry the outside of the vase - but if you can do all that then you're OK to use this method.


2. Flowers will last much longer if you are able to put them in a dark cool place during the night. A dark place like a garage, or an outside storage area are ideal. Any unheated room or area like a conservatory, balcony or porch is second best.

Just putting the vase outside without any cover at all might be a bit hazardous. In my case I live in a neighbourhood with lots of cats, squirrels and even foxes - so in that case you never know what could happen. But even so wind and rain might not be very kind to your arrangement.

If you live where the temperatures drop below freezing in the winter - then keep in mind that cut flowers don't like it that cold! Find a place to put them where there is no frost.

3. Avoid putting your flowers too close to any heat source like a radiator or heater, in a window with direct sunlight or close to any electronic equipment that gives off heat. Warm and dry atmospheres encourages water to evaporate through the leaves and will dry out any plant material. 


4. Also avoid placing flowers next to any ripening fruit or vegetables. Ripening fruit produces ethylene gas that will make your flowers wilt faster. Different flowers are susceptible to different degrees - but even so it's not a good combination. The flowers most affected are carnations.

Sometimes combining flowers with fruit or vegetables in an arrangements can make striking combinations - just be aware of the effect ethylene gases have on cut flowers and that they will speed up the wilting.   

Decaying plant material also produces ethylene gas so therefore it's important to remove any dying flower heads and any yellowing leaves. This is both to keep the arrangement looking fresh but also to slow down the whole decaying process.


5. Some flowers in an arrangement will last longer then others and or they might not look as nice as they did to begin with. So when this happens don't be afraid of de-constructing the whole arrangement. Discard any faded flowers, cut the stems shorter and make up a new arrangement or several smaller ones. 

Maybe use bud vases or make up a collection of bottles with just one stem in each or make new arrangements in some jam jars. All different ways to make one arrangement last for as long as possible.

6. Always make sure that any container you use is watertight. If you use a glass vase you can obviously be certain - but if you use a vintage vase or container of any other material you can never be certain. Pottery, china and metal are all to be treated with suspicion! It might take a little while for the water to seep through - so be aware of that leaks might not show up straight away. I have learnt from bitter experience and I have ruined many surfaces. If you are not sure - always put a saucer, plate, tray or dish under the vase. Or you can make up the arrangement in a glass jar or similar and place that inside the larger container.


Here are links to previous 'Arrange Your Flowers!'


Have a Creative Floral Day!

~ xoxo ~

Ingrid

[Styling and photography © Ingrid Henningsson for Of Spring and Summer.]
    

8 October 2014

Arrange Your Flowers! - # 3 - How To Condition Your Cut Flowers


This is the third instalment of 'Arrange Your Flowers!'. The first one was about the essential tools that you need. The second one was about the importance of keeping your tools and containers clean and in good working order.


This the third one will be about how to trim your flowers and branches when you condition them and why. 

You'll need:

- a pair of flower snippers
- a pair of florist's scissors
- a pair of secateurs - if you are doing any thicker branches
- all your tools should be clean and sharp
- a clean florist's bucket filled with tepid water
- a bucket or similar to collect leaves and ends of stems 

1. Your flowers will have an elastic band around the stems and will probably have some kind of cellophane or be wrapped in paper for protection.

You will have to remove the elastic bands and the wrapping - use the pair of scissors to snip the elastic and cut the cellophane from the bottom up towards the top. Cutting it will be easier than to try to lift the flowers out of the cellophane. It's just too easy to damage the flowers if you try to do it that way. 

The one exception to removing string around flowers is if you have been given or sent a fancy hand-tied bouquet from a friend or florist. Do not remove the string or raffia around the flowers - it's there to hold the flowers in place and if you remove it - the lovely and probably very expensive arrangement will fall apart. Instead just trim the ends of the stems, remove any foliage below the water line and plunge the whole bouquet straight into a vase with water.  


2. Next remove all the lower leaves on the stems that would end up below the water line in the vase. Leaves sitting in water deteriorate faster than stems and produces bacteria that will shorten the life of the flowers.

How you remove the leaves depends on what kind of flower it is. Sometimes you can tear, sometimes you have to snip them off with a pair of scissors or snippers.

What's important is that you do it cleanly and don't tear or damage the stems. Any damage just like any leaves left on will further deteriorate in water and increase the growth of bacteria. 

Work on a flat surface and tidy away as you go along. 


3. You should now have pile of flowers with their lower leaves removed ready to be trimmed and put in water.

For any soft stems use either your floral snippers or scissors.  
Cut each stem at an angle - make the angle as sharp as you can - this exposes more of the stem and allows more water to be absorbed. But be careful not to to crush flowers that has soft or hollow stems - it's easily done. If this happens re-cut the stem with less of an angle. 

Cutting the stems at an angle also means that the stems will not sit against the bottom of the vase and reduce any uptake of water.

Make the cut just above a node - the slightly thicker part of the stem from where the leaves grow - on most flowers you can find the nodes at regular intervals along the stems. Cutting just above a node helps water absorption.

Have your container of water ready and after the cut immediately plunge the flower into water.


4. I cannot emphasise the importance of keeping your cutting tools as sharp as you possibly can.

It's very easy to crush the soft stems when you cut them - so the sharper and cleaner the cut - the less damage is done to the bottom of the stems, the more water will be absorbed and the longer the the flowers will last. 


5. You will need to use a pair of secateurs or strong snippers to cut any woody stems. Again, cut at an angle - above a node and then make another additional vertical clean cut up from the base of the stem. 

For a long time you were given the advise to crush or mash the bottom of woody stems with a hammer. Don't do that! It makes the perfect breeding ground for bacteria and less water will be absorbed because of the damaged cell tissues.

Again - after the cuts plunge the branches straight into some water.   


Here is a link to the first Arrange Your Flowers! - # 1 - Essential Tools for Cut Flowers

Here is a link to the second Arrange Your Flowers! - # 2 - How to Keep Your Cut Flower Tools Clean and Sharp

I'll be back in two weeks with more advice on how to 'Arrange Your Flowers!'. 

Have a Creative Floral Day!

~ xoxo ~


Ingrid

[Styling and photography © Ingrid Henningsson for Of Spring and Summer.]

Related Posts Plugin for WordPress, Blogger...