Showing posts with label Zinc Container. Show all posts

8 May 2016

Florets - Floral Quote - # 111 - by Carly Cylinder


"If I had to give just one piece of advice, it would be this: Change the water in the vase at least every couple days. And if not every couple days, then at least once during the lifetime of the arrangement. Flowers thrive on fresh water. To refresh the water in a small-to-medium arrangement, place the vase under the faucet in your kitchen sink and run the water so that it flushes out the old water. Flushing out your vase under the faucet refreshes the water while keeping your arrangement intact. For taller vases, carefully tilt the arrangement to pour out the old water, and refresh with new water."


~ Carly Cylinder ~  


[Carly Cylinder: American, florist,owner and creative director of FlourLA,Inc., a Los Angeles and New York based flower design studio. Her work has been featured on many blogs and websites and she is the author of the book The Flower Chef.]
[Quote from: The Flower Chef by Carly Cylinder (2016).]
[Flowers: Blue and white hyacinths.]
[Container: Round zinc container.]
[Styling and Photography © Ingrid Henningsson/Of Spring and Summer.]

Enjoy your flower arranging and have a fabulous and floral Sunday!

I'll be back next week with more floral delights from Of Spring and Summer.
Ingrid 

~ xoxo ~

For more floral inspiration follow me on:

Facebook: https://www.facebook.com/ingrid.henningsson

8 April 2016

FLOWERS by ingrid and titti - Spring is in the Air!


Yes, spring is definitely in the air here in London! Titti and I thought it would be a suitable theme for this weeks FLOWERS.


To capture the feeling of spring with flowers is not difficult at this time of year - flowers are in abundance and the colours are fabulous.


For this spring bouquet I have used white and pink tulips, some ranunculus in a couple of different pink shades and for green foliage a small leafed eucalyptus. 


I also made a second mini arrangement in a very small watering can - four ranunculus with a few little sprigs of eucalyptus and some raffia to hold it all together - just leaning to one side. A charming way to display a tiny arrangement. 


The large container is a zinc florist bucket that I have had for many years and it's still in use almost every day. Talk about good value for money!


The big arrangement is made straight in the container and I have grouped a few of the same flower together to prevent the flowers looking like dots.  


The piece of floral fabric that I'm using as a tablecloth picks up the pink and green colours in the flowers. A quick and easy way to make a base for the arrangement and to blend and tie it all together.


I think spring has arrived in the south of Sweden too - were Titti lives - I can't wait to see what spring-like flowers she has to show us. Here is the link to her blog. 


Have a lovely floral day!

We'll be back later in the month with another 'FLOWERS' -also with a spring theme. Before that I'll see you later in the week.

16 October 2015

A Bunch for the Weekend - # 61 - Autumn Colours


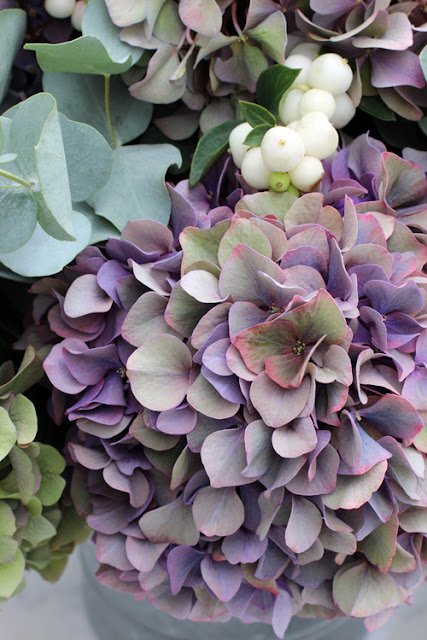
Hydrangea Autumn Colours

This weeks 'A Bunch for the Weekend' - is all in muted autumn colours. Pale purple and olive green Hydrangea with some rust coloured shades. Also mixed in are some pale grey green Eucalyptus leaves and some bright white snowberries.


Hydrangea Autumn Colours

HOW TO:

You'll need:

- 10 stems of Hydrangea in muted colours.
- 5 stems of Eucalyptus leaves.
- 5 stems of snowberries.
- 1 medium sized zinc florist bucket - for the arrangement
- 3 zinc florist buckets in various sizes - just to use as background props.
- 1 very small zinc container - to use as a side arrangement with Eucalyptus or snowberries.

For conditioning the flowers - you'll also need:

- a pair of florists scissors
- a florist bucket filled with fresh water

Condition the flowers by removing any leaves that would end up below the water line in the vase. This is to reduce any growth of bacteria from deteriorating leaves. Also remove any broken or bruised leaves.

Cut the stems at an angle - this is to increase water absorption.  

Put in a clean container with fresh water and leave in a cool, dark place over night or at least for a few hours, to let the flowers absorb the maximum of water, before making the final arrangement.


You might have to re-cut the stems while making the final arrangement to suit the size of the vase or container and to get the right proportions.

Hydrangea Autumn Colours

Method:

Hydrangea has very few but large leaves - leave them on if you like the look of them or take off some or all of the leaves. 

I have left a lot of the leaves as I feel they added interesting texture and colour.

Fill the containers with fresh, clean water. Trim the stems so that some of the flower-heads rests on the edge of the vase. Cut some of the stems shorter and position those around the edges of the container. Fill in with a few longer stems throughout for a bit of variety and movement.

Finish off by adding the Eucalyptus and the snowberris throughout the arrangement.

Change the water every 2-3 days and if possible re-cut the stems. The flowers can last for about 7-14 days. 


Hydrangea Autumn Colours

The four pieces of artwork are by my dear sister-in-law Amy Trachtenberg who lives and works in San Francisco. I have always enjoyed having her beautiful and very tactile artwork around the house and often try to incorporate them in my photography. 

Hydrangea Autumn Colours

Enjoy your flower arranging and have a great floral day!

I will be back on Sunday with another Florets - floral quotes by people passionate about flowers!

~ xoxo ~

Ingrid


[Styling and Photography: © Ingrid Henningsson/Of Spring and Summer.]
[Artwork by Amy Trachtenberg.]


You can also find me on:


6 March 2015

A Bunch for the Weekend - # 42 - Blue and White Hyacinths


Today on 'A Bunch for the Weekend' - I'm featuring some blue and white hyacinths in a zinc container.

Hyacinths are spectacular at the moment they are still going strong and a real pleasure to use as cut flowers.


You'll need:

- 9 stems of blue hyacinths
- 5 stems of white hyacinths
- a low wide container in a neutral colour - in this case I have used a zinc container
- a piece of ornate Victorian iron work
- a large round blue and white plate
- a vintage blanket in dark colours 


For conditioning the flowers - you'll also need:

- a pair of florists scissors
- a florist bucket filled with fresh water

Condition the flowers by removing any leaves that would end up below the water line in the vase. This is to reduce any growth of bacteria from deteriorating leaves. Also remove any broken or bruised leaves.

Cut the stems at an angle - this is to increase water absorption.  

Put in a clean container with fresh water and leave in a cool, dark place over night or at least for a few hours, to let the flowers absorb the maximum of water, before making the final arrangement.

You might have to re-cut the stems while making the final arrangement to suit the size of the vase or container and to get the right proportions.

These stems come from hyacinth bulbs that I grew myself in pots and I just cut the stems and left all the leaves with the bulbs. When the leaves has died down I will plant them in my garden. Hopefully they will come back next year and not be decimated by slugs and snails or dug up by squirrels. 


You need to cut the stems quite short - but long enough to stand above the edge of the container - so hold the flower against the side of the container and measure.

I have packed the 14 stems in quite tightly - that way they all support each other.

Arrange the stems in a pleasing pattern according to colour and size of the flower heads. 


Experiment with the colours you surround the arrangement with - greys and blues all look lovely with the blue and white flowers. 

I have also added a fun little detail by putting a strip of grey washi tape along the edge of the zinc tub - its very easy to remove from any surface when you don't want it any more.

You can also do this with a smaller vase or container if you don't want to use as many stems as I have done. You can't go wrong here!!


Have a Happy Floral Friday and Enjoy Your Weekend!

~ xoxo ~

Ingrid

[Styling and Photography © Ingrid Henningsson for Of Spring and Summer]

26 December 2014

A Bunch for the Weekend - # 34 - Skimmia japonica 'Rubella'


This week on 'A Bunch for the Weekend' - I'm featuring a bit of an unusual plant as a cut flower and it's called Skimmia japonica 'Rubella'.

We have just passed the shortest day of the year and flowers in the garden are in short supply, flowers in the florist shop during the winter season often come from far away and can be expensive.

There are some lovely potted plants around at this time of year - such as Poinsettia, Cyclamen, Paperwhites, Hyacinths and Amaryllis.

All these flowers are lovely and delightful - but I have already used all of them at least once in the last months - so I decided to try something a little bit different this week. 

I'm using a low-growing evergreen shrub called Skimmia japonica 'Rubella' and both my local flower stall and greengrocer were selling it as a cut flower.  

It has short stems but has these clusters of little, round, tight flower buds in a deep, dark, red colour and it has thick oval dark green leaves.


You'll need:

- about 7 stems of Skimmia japonica 'Rubella' - they will all have 2-3 flower heads on each stem 
- a medium size vase or container in a neutral colour - I have used a vintage zinc container
- a jam jar to put inside the main container 
- 3 grey and 3 white tissue paper poms poms - in three different sizes
- 3 Kosta Boda glass Snowball votive lanterns with tea-lights


For conditioning the flowers - you'll also need:

- florists snippers or scissors
- a florist bucket


As always - you need to condition the flowers - remove all the lower leaves that would end up below the waterline in the vase. Cut the stems at an angle - to increase water absorption. Put in a clean container with fresh water and leave in a cool place over night or at least a few hours before making the final arrangement.

With woody stems you also need to make a vertical cut up the stem to increase the area for water absorption. 


The container I have used can not be trusted not to leak and I also don't want it to get any more rust - so I'm using a jam jar filled with water inside.

The Skimmia stems are not very long so the arrangement will be fairly low and wide. The side of the zinc container flares out so the flowers will sit very nicely in a loose and natural arrangement.

The red flowers sits perfectly against the grey zinc and the grey is also picked up in the grey pom poms in the background.    


The grey and white tissue paper pom poms are all piled up in one corner and I have positioned three Snowball candle holders at the other end - both round and a little festive to fit the season.


Have a Happy Floral Friday and a Great Weekend!

~ xoxo ~

Ingrid

[Styling and Photography © Ingrid Henningsson for Of Spring and Summer]

10 November 2014

Take 3 Flowers! - # 2 - Pink Tulips and Ranunculus with Eucalyptus Foliage


This is the second blog post in the series 'Take 3 Flowers' - where I will show you how to make easy but beautiful and stylish flower arrangements - just using three different flowers. Often one of the three will be some kind of foliage.

Using just three flowers will sometimes be a challenge - but it will also keep the cost down. Cut flowers can be expensive but foliage on the other hand tends to be cheep. You can use lots of it to help fill out the arrangement and to provide support and structure for the other flowers. 

I loved the contrast between the strong pink of the tulips and the Ranunculus; and the silver grey of the Eucalyptus leaves.

You'll need: 

- 9 stems of dark pink tulips
- 7 stems of dark pink Ranunculus
- 12 short stems of Eucalyptus leaves or similar silver grey foliage
- a fairly large vase or container - in this case I have used a florist's zinc bucket


Tulips are starting to appear at flowers stalls on London street corners - and they come in all kinds of yummy and delicious colours.


And also finding Ranunculus in similar colour to the tulips - I didn't have too hesitate.

Pink and grey is a lovely combination - so the grey-green Eucalyptus leaves were perfect.


For conditioning the flowers - you'll also need:

- florists snippers or scissors
- a florist bucket

As always - condition the flowers by removing any leaves that would end up below the water line in the vase. Cut the stems at an angle - to increase water absorption. Put in a clean container with tepid water and leave in a cool, dark place over night or at least a few hours before making the final arrangement.

Sorry, about always repeating this last bit - but it's probably the most important thing you can do to make your flowers last longer! So I'm afraid you have to put up with me always going on about it.


Start by cutting down the the Eucalyptus into smaller stems. They should not be too long - you want the flowers to sit above the foliage.  You'll need between 10 and 15 little stems - depending on the size of container. First line them around the edges and then fill in the middle with the rest of the stems.

Put the vase at the edge of the work surface and measure the height of the flowers before making the final cut. The Ranunculus should sit just above the foliage - but you can cut the tulips a bit shorter as they will continue to grow in the vase.  


A bowl of pink raffia! I love raffia and use it all the time to tie flowers and I tie it around vases as containers as decoration; I also use it instead of string or ribbons when I wrap presents.


In among the flowers and the pink raffia I have placed two little mini zinc watering cans. 

The evenings are getting darker and longer and its the time of year when its nice to light some candles. Have used some vintage mini tart tins with fluted edges to hold some tea lights. 

So here you have some flowers in strong colours and some little candles to brighten up the dark autumn evenings.


Have a Lovely Floral Monday!

See you later in the week!

~ xoxo ~

Ingrid


[Styling and photography © Ingrid Henningsson for Of Spring and Summer.]

28 September 2014

Florets - Floral Quote - # 78 - by Kristin Perers


"Find creative ways to bring nature inside. Look to what is left in the garden. Flowers such as rudbeckia, nigella, poppies and sunflowers have wonderful sculptural seed heads, giving them a life long after what is normally considered their prime. Combine spiky thistles and plump rose hips with turning foliage for vibrant autumnal display. "


~ Kristin Perers ~
[Kristin Perers: American based in the UK, designer, stylist, painter, photographer and author of The Seasonal Home.]
[Quote from: The Seasonal Home by Kristin Perers.]
[Flowers: Asters.]
[Vase/container: Zinc florist bucket.]
[Styling and photography © Ingrid Henningsson.]


Have a Lovely Floral Sunday!

~ xoxo ~

Ingrid


5 September 2014

A Bunch for the Weekend - # 20 - Gladiolus


This week on 'A Bunch for the Weekend' - I'm featuring some Gladiolus in an amazing light green colour. 

It's a flower that I will forever associate with the Australian comedian Berry Humphries and his alter ego Dame Edna Everage. The Gladiolus was the character Edna's favourite flower and she would bring out big bunches on stage and during the finale throw the flowers into the audience. 


Gladiolus was for many years not a flower that I would ever buy. I associated it too much with being old-fashioned and for a long time it was hard to find. I'm now glad to see that it has made a comeback. 

I found these lime green beauties at my local farmers market. I made two arrangements - one large in a vintage zinc container and a very small one in a little contemporary Danish vase.  


It's such a wonderful structural flower - tall and slender so perfect for an arrangement in a tall vase. But I also wanted to see how it would work cut down and used with a very short stem.

You'll need - for the large arrangement:
- 7 stems of Gladiolus
- a tall container with a not too wide opening

You'll need - for the small arrangement:
- 1 stem of Gladiolus - cut down so that only 3-4 flowers remain
- small vase with straight sides
- small pebbles

As always - condition the flowers by removing any unwanted leaves - cut the stems at an angle - to increase water absorption. Put in a clean container with tepid water and leave in a cool place over night or at least for a few hours before making the final arrangement.

In the large arrangement - cut the stems so that the flowers sit just a short distance above the edge of the vase - showing a little bit of stem. I then simply arranged all the stems to just lean to one side of the container. It makes it all look a little bit less formal.

For the small arrangement start by trimming the stem so you only have a few of the top flowers left on the stem. Cut it so that the bottom flower sits just above the edge of the vase. You might also need to put a few little pebbles in the bottom of the vase to support the flower stem to stand straight. 


The little black vase is Danish and is called Lyngby Vase by Hilfling Design.

Gladiolus are available to buy during the summer and autumn. To be sure the flowers are fresh the leaves should be crisp. You also sometimes are given the advise to remove the tips of the flowers to stimulate the buds further down the stem - because the top buds often never open. 


Have a Wonderful Floral Friday!

~ xoxo ~

Ingrid


[Styling and photography © Ingrid Henningsson for Of Spring and Summer.]


Related Posts Plugin for WordPress, Blogger...