Showing posts with label Red. Show all posts

25 December 2016

Happy Christmas 2016!


I would like to wish everybody a wonderful and very Happy Holiday!

God Jul!

Happy Christmas!

Season's Greetings!

Happy Hanukkah!


All the best and lots of love!

xoxo Ingrid

I'm now taking a few days off to spend with family and friends and I will see you again next week!

2 November 2016

Creative with Flowers - # 23 - Red Dahlias


It's hard to believe that it's the first of November and one of my favourite flowers are still flowering and available to buy at farmers' markets in London. 

This week we are taking a look at some gorgeous red ball Dahlias.  


This series of blog posts - called 'Creative with Flowers' - are about using flowers in creative ways. It could be about how the flowers are combined - maybe in a little bit of an unusual way. It might be the choice of vase - maybe not a vase at all but a container that could be anything from jugs, bottles, jars, tins or teapots - vintage or new it doesn't matter. 

As always my arrangements will be quick and easy - and there will always be lots and lots of colour!


Ball-Dahlias are described as - "fully double, ball-shaped, or slightly flattened at the top". The little florets are spirally arranged and the tips are rounded or blunt. 

I have made a very easy arrangement - straight in the vase or as in this case a large vintage pickling glass jar.

Remove any leaves that would sit below the water line in the container. I have kept any above that on the stems as well as all the unopened buds - just to add some interesting green texture.


As always I add a few props - that either match in colour or have an interesting contrast of colour.


This time I have also used a vintage basket - bought in Sweden at a 'loppis'. The Swedish version of flea-market or car boot sales.

I filled it with old garden tools - some were my father's and I also have a few that belonged to my grandmother.

In the background hangs a kilim rug in beautiful faded colours. 


It's November and the evenings are getting longer. I light lots of candles every evening at dinner. It adds some light and a welcoming warming glow.

I love these little beaded tea-light holders that I found in a charity store. The small coloured glass beads adds a bit bling and sparkle to any dark evening.  


Enjoy your flower arranging and have a fabulous and floral Wednesday!

Thank you for visiting 'Of Spring and Summer'. I will be back later in the week. Hope to see you then. 
Ingrid 

~ xoxo ~

[Styling, photography and text © Ingrid Henningsson/Of Spring and Summer.]

P. S. Did you know that you can subscribe to receive a notification via email whenever I have a new blog post. Just fill in your email address at the top of my blog on the right and an email will come right into your inbox.

For more floral inspiration you can follow me on:

Facebook: https://www.facebook.com/ingrid.henningsson

28 October 2015

Do-It-Yourself Flower Tips and Inspiration - # 12 - Dahlias, Crab Apples and Rose Hips


This time 'Do-It-Yourself Flower Tips and Inspiration' is all about Dahlias, Crab apples and Rose hips. 

But this time it's more about colour and how to use the flowers, fruits and rose hips. 


When I came across this mixture of flowers, fruit and hips at my local Saturday farmers' market - I knew it was a winning combination. 

The red and orange crab apples matches the red and orange Dahlias; and the little rose hips adds a different texture in a similar colour.

I have happily mixed the Dahlias with both the crab apples and the rose hips into a big riot of orange and red. Using a large plain clear glass container works well - as it will not take any attention away from the flowers.


You can use the crab apples by mixing them in with the flowers in the container, scatter them on the table or they also add colour by just simply putting them in a bowl. 


I have left some of the crab apples lower down on the branches so that you can see them through the clear glass - a fun and little different detail. Just keep them out out of the water.

The little sweet rose hips lasts quite well out of water - so you can add them to a wreath or a garland as well as combining them in a container with other flowers like I have done here.

This is an arrangement with a lot of red and orange colours as well as lots of different textures and movement perfect for greeting your guests in the hall or on a side table in a living room. 

Enjoy the autumn colours for the short time that they are here!


Enjoy your flower arranging!

I'll be back on Friday with another 'A Bunch for the Weekend'
~ xoxo ~

Ingrid


[Styling and Photography: © Ingrid Henningsson/Of Spring and Summer.]


22 April 2015

FLOWERS by ingrid and titti - All on a Plate


The theme for FLOWERS this week is 'All on a Plate' and I have created four colour coordinated plates using the flowers and berries as a starting point.


On four different plates I have assembled a napkin, cutlery, beads and buttons, flowers and berries, tags or labels decorated with washi tape and some different twines.


Next to each place setting is a little vase with flowers - from the top - blue grey Eryngium or Sea holly - next down are some gorgeous pink spray Dianthus or mini carnations. 

With the purple plate I also used mini carnations but in a different colour and the last plate has red berries from a shrub in my garden called Nandina domestica.


On the side of each plate under the napkin I have tucked the same flower as in the vase.

The napkin is tied with either baker's or garden twine in matching colour.  


All the little tags are decorated with colour matching washi tape. Remember the Japanese paper tape that was so popular a couple of years ago. I still have a shoebox full of them and I often use them when wrapping presents.

Just a few strips of the tape makes all the difference - turning something plain and ordinary into a little bit more special.


Sticking to one colour gives the whole table cohesion and forms a united whole - but you could also try using contrasting colours.


Hopefully you will have found some ideas and inspiration for next time you are having a dinner party.


Titti Malmberg - my Swedish based collaborator - who I work alongside on FLOWERS - has also created a new post on her blog HWIT BLOGG - so please follow the link and go over and see how she has interpreted the theme. 


Have a Very Happy Floral Wednesday!

I'll see you later in the week with more flowers from 
'Of Spring and Summer'

~ xoxo ~ 

Ingrid


[Styling and photography © Ingrid Henningsson for FLOWERS and Of Spring and Summer.]


2 February 2015

Take 3 Flowers! - # 6 - Red and Pink Roses with Green Foliage


Red and Pink Roses


I'm back with another blog post in the series 'Take 3 Flowers!'

In this blog series I will show you how to make easy but beautiful and stylish flower arrangements - just using three different flowers. Often one of the three will be some kind of foliage.

Using just three flowers will sometimes be a challenge - but it will also keep the cost down. Cut flowers can be expensive but foliage on the other hand tends to be cheep. You can use lots of it to help fill out the arrangement and to provide support and structure for the other flowers.

I'm using two different roses - a dark red one and a light pink one. Normally roses are not cheep - but these were being sold in big bunches of 10 and 20 roses in each for very little money. I was working on another project where I also needed roses so I went for it.

The foliage is light green variegated Pittosporum that grows in my garden - so all I had to do was to go out and cut a few branches. I use it all the time because it has a lovely green colour that goes well with a lot of different coloured flowers. 


Red and Pink Roses

You'll need: 

- 7 stems of dark red roses
- 5 stems of light pink roses
- 5 stems of Pittosporum tenuifolium 'Silver Queen'
- a re-cycled tin/can - washed and with the label removed

For conditioning the flowers - you'll also need:

- florists snippers or scissors
- a florist bucket

Condition the flowers by removing any leaves that would end up below the water line in the vase. This is to reduce any growth of bacteria from deteriorating leaves.

Cut the stems at an angle - to increase water absorption.  

Put in a clean container with tepid water and leave in a cool, dark place over night or at least for a few hours before making the final arrangement.

You might also have to re-cut the stems while making the final arrangement to suit the size of the vase or container.


Red and Pink Roses

I often find the roses you buy at this time of year a bit stiff and formal - I don't want to say that I don't like them - because I like most flowers - but I wanted to use them in a little bit of a different way.

So - I choose to use a regular old re-cycled tin or can as the Americans call them. I have left it plain but you could decorate it by painting it, using washi tape or tying ribbons, twine or raffia around it.  

Red and Pink Roses

Start off by putting in all the stems of the foliage evenly throughout the container. Measure the roses against the side of the tin before making the final cut and leave them just long enough to rest on the edge of the tin. 

Make a nice dome shaped arrangement with some of the flowers in the middle a bit longer and have the foliage weave their way between the roses and show above the roses to give some texture and height.  

Red and Pink Roses

I find the contrast fun and interesting - formal stiff roses and a bit of re-cycling or re-using something that most people throw away.

This could also be an early inspiration for Valentine's Day - because despite using an old tin - the arrangement has everything you want from a Valentine's arrangement - with its sweet and romantic red and pink roses and beautiful foliage.


Red and Pink Roses


Have a Lovely Floral Monday!

See you later in the week!

~ xoxo ~

Ingrid


[Styling and photography © Ingrid Henningsson for Of Spring and Summer.]


26 January 2015

Tiny Blooms - # 7 - Red, Pink and Purple Cyclamen


Cyclamen as Cut Flowers

This series of blog posts - called 'Tiny Blooms - are about small arrangements. Small - might be the size of the container or it could be the size of the flowers or the amount of stems in each container. It will also be that the arrangement is minimal both in presentation and that it's quick and easy to do. Apart from that there are no other strict rules - I'm allowing myself a lot of creative freedom!


As my tiny bloom flower I have used yet again some small cyclamen as cut flowers - but this time they are red, pink and purple.

Back in December I bought a whole tray of little pots with lots of cyclamens in bud. I kept them just outside my kitchen door where I could see them through the window while doing the dishes. Over time they happily opened up their beautiful little flowers.

Cyclamen as Cut Flowers


This time I wanted a more romantic feel to my arrangement - but I also wanted a dramatic colour contrast. The flowers have such a strong colours - I felt they needed a little bit of a neutral background. So I picked some clear glass containers and a off-white background to suite the occasion. 

So for this new little project I cut about 45 stems and put them in a collection of nine small clear glass containers. Some are vintage perfume bottles, others apothecary jars and others are little treasures that I have no idea what they were used for.

Cyclamen as Cut Flowers


A very quick and easy arrangement where the flowers last for about a week and if you plant the cyclamen plant in your garden - it will come back year after year.

It would look good on a small table or in a bedroom on a bedside table. The little collection of vases would also look lovely on a small tray on a dining table. 

Here are two previous blog posts featuring Cyclamens. In the first I have used big white flowers in a pot and the other has little white flowers in a small black vase.


Cyclamen as Cut Flowers


Have a Lovely Floral Day!

I'll see you later in the week!

~ xoxo ~

Ingrid 


[Styling and Photography © Ingrid Henningsson for Of Spring and Summer.] 

13 December 2014

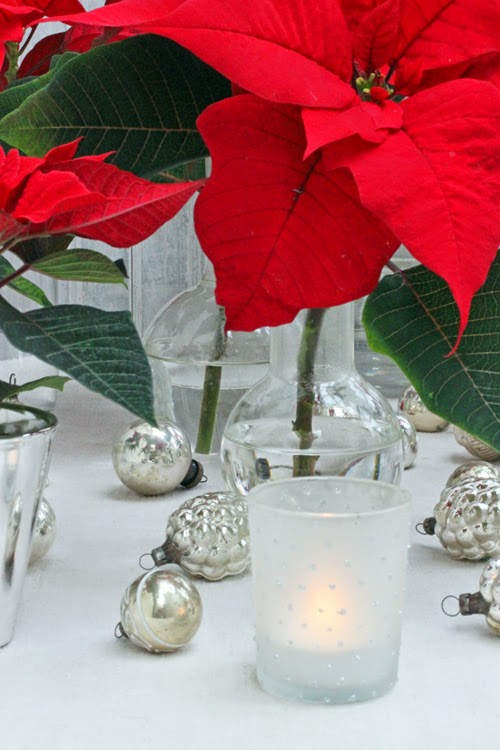
A Bunch for the Weekend - # 33 - Red Poinsettia


This week on 'A Bunch for the Weekend' - I'm featuring some bright red Poinsettias.

I'm using them here mostly as cut flowers - but I also have some potted mini ones. Nowadays you can buy large pots of Poinsettias very cheep in the supermarkets or DIY stores - and they make fabulous cut flowers.

All the ones I found are British grown - not flown in from far away - so that is very nice.

I wanted to display them in a very simple and neutral setting - and I didn't want to add any more colour - I felt the red was bright enough - so I just added some seasonal white and silver. 


You'll need:

- 2 large pots of Poinsettias with about four to six flowers on each plant
- 3 mini pots of Poinsettias with just one small flower on each
- lots of different size clear glass apothecary jars and containers or similar clear glass containers
- some tea-lights in candle holders with a bit of sparkle
- 10-12 small silver Christmas tree baubles 


For conditioning the flowers - you'll also need:

- a pair of florist scissors or snippers
- a florist bucket
- a container with boiling water

Cut the stems at an angle - to increase water absorption. 
But when you cut Poinsettias they excrete a milky sap - so you need to stop the sap leaking out to prevent the flower from wilting - some extra little conditioning methods are needed. 

There are a few ways to stop the sap leaking out of the plant. One is to sear the end of the stem with a flame for 10-15 seconds - another is to dip the end in boiling water for 30 seconds and yet another is to after cutting put the flower in warm water and leave it there until the sap stops flowing - then change the water.

I'm following Sarah Ravens suggestion of using the boiling water method. Cut the stem at an angle - have a bowl ready with boiled water - dip the bottom 5 mm/1/4" of the stem and hold it there for 30 seconds.


Arrange the flowers in the clear glass containers - I have used vintage apothecary bottles and jars with just one stem in each - super simple.

Among the bottles I have then arranged the three mini Poinsettias, some tea-lights in sparkly little candle holders and scattered quite a few small, silver Christmas tree baubles.

Quick, easy, minimal (except for all the red!) and as it turned out very cheep. Above all very seasonal and very much Christmas - but with a new slant on how to use a traditional Christmas flower! 

Here is a blog post I wrote two years ago - quite interesting that I used the same Christmas baubles and the same kind of mini Poinsettia in little silver pots. Back then I didn't know that you could use Poinsettia as a cut flower - you'll find that there is a bit more information about Poinsettia and some interesting links. 

Here is a link to what is called Stars for Europe - a European website with lots of information about Poinsettia. 


Have a Happy Floral Saturday and a Great Weekend!

~ xoxo ~

Ingrid

[Styling and Photography © Ingrid Henningsson for Of Spring and Summer]

29 August 2014

A Bunch for the Weekend - # 19 - Red and Orange Dahlia


There are so many wonderful Dahlias around at the moment - so this will be a week of Dahlias. It's that time of year and I'm not complaining - I love Dahlias. I wished they would last longer in the vase - but you cant't have everything.

So here we go again with some more - so on 'A Bunch for the Weekend' this week I'm featuring some striking red and orange Dahlias.


I chose a clear glass container to use as a vase. It's a vintage pickling jar that I bought at a 'loppis' in Sweden for not a lot of money. 'Loppis is the Swedish equivalent to flea-market or car-boot sale.

I love the dark colour of the stems on these Dahlias - they are such an interesting contrast to the red and orange. And I also love how you can see the stems criss-crossing through the clear glass - making a pattern all on their own. 


I find that you often never know if a Dahlia bud is going to open up or not. The tighter the bud the less likely it is to open up and develop into a flower. Sometimes they open just a little bit - like the ones in the picture - it's all very unpredictable. But mostly you'll get the advice that once cut the Dahlia buds will not open.


Buds are decorative in their own right and there is no need to discard them completely. It all depends what look you are after. A mass of just big Dahlia heads of flowers or an arrangement dotted with buds - breaking up the sea of colour. Buds or no buds - both are worth trying.

As always - condition the flowers by removing any leaves that would end up below the water line in the vase - cut the stems at an angle - to increase water absorption. Put in a clean container with tepid water and leave in a cool place over night or at least a few hours before making the final arrangement.


Have a Wonderful Floral Friday!

~ xoxo ~

Ingrid 

2 April 2014

Vases, Vessels and Vintage - # 3 - Pink & Red Vases


I have a confession to make - I have a lot of vases!

I have a large collection of all kinds of vases and containers - but I don't feel guilty about it. I use them in my daily work - while styling and photographing flowers.

Vases, vessels or containers - call them what you like - can be so much fun when you arrange flowers. Here is a small part of my collection - the pink and red one.


I have some very old antique vases, I have a lot of vintage and retro containers and I also have a lot of new ones. 

Some are inherited, others are bought at antique fairs, some are from car boot sales and flea markets and a lot are from charity stores. I have never spent a lot of money as you don't have to because vases are often cheep. 


This, my small red and pink vase collection, range from a Victorian scent bottle, a fairy light candle holder, a two-toned 1920's glass vase, a pink 1940's retro ceramic vase to some new mini bud vases and a small candle holder.


 Here are some images of a few of the pink and red vases. 

I have used five different tulips in a range of different pinks - it's a mix of parrot, fringed and double tulips - all gorgeous.  


What is interesting about tulips is that they continue to grow in the vase, the petals also open up and they often change colour - they are almost the most beautiful just before the petals drop. 

The last image is similar to the first one. It's the same flowers in the same vases - just a few days later. You can clearly see the change in the tulips. I think even more beautiful!

  
Have a Creative Floral Day!

See you on Friday with another FLOWERS by ingrid and titti and this time it's about something a little bit different!

xoxo Ingrid

[Styling and photography © Ingrid Henningsson for Of Spring and Summer.]

Related Posts Plugin for WordPress, Blogger...