Showing posts with label Flower Snippers. Show all posts

18 January 2017

Arrange Your Flowers! - Basic Tools for Flower Arranging


Before we know it spring will be here and with spring comes lots of spring flowers.

I have decided to relaunch my series of posts called 'Arrange your Flowers!' - so that we can be ready and know what to do with all those beautiful and stunning flowers. 

Some of what you read you will have come across before. There is very little new in the flower arranging world - apart from all the creativity we can all add to our flower arranging.

But I do have some exciting news to tell you about - since I last wrote on 'Arrange Your Flowers!' - I have trained in floristry and that will be very useful while writing these blog posts.

It makes me very happy to be able to pass on all the inside tips and tricks from the florist world. 

So this is all about arranging your own flowers - it will have do-it-yourself flower arranging ideas, tips and advice. All the advice will be very easy to follow - even if you've never done any flower arranging before. 

It will be very basic and very down to earth.

So let's start from the beginning!
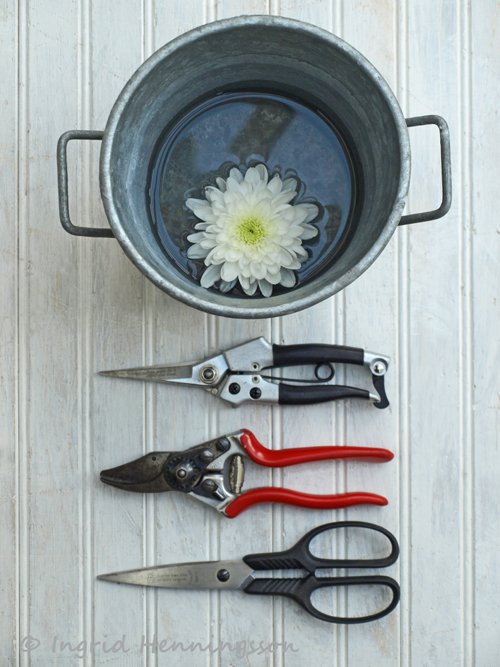

These are the most basic but essential tools that you need to start doing your own flower arranging:

1. A couple of different size containers - they can be plastic or metal. Nothing fancy, it's just a container to put the flowers in after you've conditioned them. Traditionally florists flower buckets were metal - mostly zinc but now they tend to be plastic.

Also remember to keep your containers scrupulously clean! 


2. A pair of floral snippers or floral scissors - like the black handled scissors and snippers in the second image and the bottom image. Buy a pair that is comfortable to use and that will not hurt your hand - if you are using them for a long time. 

It's quite useful to have both a pair of snippers and a pair of scissors. The scissors will be useful to cut elastic bands around the flower stems and for cutting the cellophane that the flowers come wrapped in - it's easier to do that with a pair of scissors. Floral scissors or florist's scissors are a bit more sturdy and have stronger blades than a normal pair of scissors - so are also excellent, if sharp, to cut flower stems. 

In the end it's a personal choice and what you are the most comfortable using.


3. You will also need a pair of secateurs or pruners for cutting thicker stems or branches - like the red handled secateurs in the second image. If you don't already own a pair - get a good quality one - as they usually last a lifetime. 

I hope all my tips will be useful and easy to follow and that they will help to keep your flowers looking good and last longer.

Have a Creative Floral Day!

~ xoxo ~

Ingrid


Thank you for visiting 'Of Spring and Summer' - I will be back later in the week with more floral delights.


[Styling and photography © Ingrid Henningsson/Of Spring and Summer.]

P. S. Did you know that you can subscribe to receive a notification via email whenever I have a new blog post. Just fill in your email address at the top of my blog on the right.

*****
P. S. If you are looking for more floral inspiration you can go over and have a look at my Pinterest boards. I have just over 200 boards all relating to flowers, floral styling and flower arranging. There are boards on individual flowers and shows how to arrange them. Other boards show different ways of using vases and containers. Simply click on the link below and it will take you straight there.

2 February 2015

Take 3 Flowers! - # 6 - Red and Pink Roses with Green Foliage


Red and Pink Roses


I'm back with another blog post in the series 'Take 3 Flowers!'

In this blog series I will show you how to make easy but beautiful and stylish flower arrangements - just using three different flowers. Often one of the three will be some kind of foliage.

Using just three flowers will sometimes be a challenge - but it will also keep the cost down. Cut flowers can be expensive but foliage on the other hand tends to be cheep. You can use lots of it to help fill out the arrangement and to provide support and structure for the other flowers.

I'm using two different roses - a dark red one and a light pink one. Normally roses are not cheep - but these were being sold in big bunches of 10 and 20 roses in each for very little money. I was working on another project where I also needed roses so I went for it.

The foliage is light green variegated Pittosporum that grows in my garden - so all I had to do was to go out and cut a few branches. I use it all the time because it has a lovely green colour that goes well with a lot of different coloured flowers. 


Red and Pink Roses

You'll need: 

- 7 stems of dark red roses
- 5 stems of light pink roses
- 5 stems of Pittosporum tenuifolium 'Silver Queen'
- a re-cycled tin/can - washed and with the label removed

For conditioning the flowers - you'll also need:

- florists snippers or scissors
- a florist bucket

Condition the flowers by removing any leaves that would end up below the water line in the vase. This is to reduce any growth of bacteria from deteriorating leaves.

Cut the stems at an angle - to increase water absorption.  

Put in a clean container with tepid water and leave in a cool, dark place over night or at least for a few hours before making the final arrangement.

You might also have to re-cut the stems while making the final arrangement to suit the size of the vase or container.


Red and Pink Roses

I often find the roses you buy at this time of year a bit stiff and formal - I don't want to say that I don't like them - because I like most flowers - but I wanted to use them in a little bit of a different way.

So - I choose to use a regular old re-cycled tin or can as the Americans call them. I have left it plain but you could decorate it by painting it, using washi tape or tying ribbons, twine or raffia around it.  

Red and Pink Roses

Start off by putting in all the stems of the foliage evenly throughout the container. Measure the roses against the side of the tin before making the final cut and leave them just long enough to rest on the edge of the tin. 

Make a nice dome shaped arrangement with some of the flowers in the middle a bit longer and have the foliage weave their way between the roses and show above the roses to give some texture and height.  

Red and Pink Roses

I find the contrast fun and interesting - formal stiff roses and a bit of re-cycling or re-using something that most people throw away.

This could also be an early inspiration for Valentine's Day - because despite using an old tin - the arrangement has everything you want from a Valentine's arrangement - with its sweet and romantic red and pink roses and beautiful foliage.


Red and Pink Roses


Have a Lovely Floral Monday!

See you later in the week!

~ xoxo ~

Ingrid


[Styling and photography © Ingrid Henningsson for Of Spring and Summer.]


8 October 2014

Arrange Your Flowers! - # 3 - How To Condition Your Cut Flowers


This is the third instalment of 'Arrange Your Flowers!'. The first one was about the essential tools that you need. The second one was about the importance of keeping your tools and containers clean and in good working order.


This the third one will be about how to trim your flowers and branches when you condition them and why. 

You'll need:

- a pair of flower snippers
- a pair of florist's scissors
- a pair of secateurs - if you are doing any thicker branches
- all your tools should be clean and sharp
- a clean florist's bucket filled with tepid water
- a bucket or similar to collect leaves and ends of stems 

1. Your flowers will have an elastic band around the stems and will probably have some kind of cellophane or be wrapped in paper for protection.

You will have to remove the elastic bands and the wrapping - use the pair of scissors to snip the elastic and cut the cellophane from the bottom up towards the top. Cutting it will be easier than to try to lift the flowers out of the cellophane. It's just too easy to damage the flowers if you try to do it that way. 

The one exception to removing string around flowers is if you have been given or sent a fancy hand-tied bouquet from a friend or florist. Do not remove the string or raffia around the flowers - it's there to hold the flowers in place and if you remove it - the lovely and probably very expensive arrangement will fall apart. Instead just trim the ends of the stems, remove any foliage below the water line and plunge the whole bouquet straight into a vase with water.  


2. Next remove all the lower leaves on the stems that would end up below the water line in the vase. Leaves sitting in water deteriorate faster than stems and produces bacteria that will shorten the life of the flowers.

How you remove the leaves depends on what kind of flower it is. Sometimes you can tear, sometimes you have to snip them off with a pair of scissors or snippers.

What's important is that you do it cleanly and don't tear or damage the stems. Any damage just like any leaves left on will further deteriorate in water and increase the growth of bacteria. 

Work on a flat surface and tidy away as you go along. 


3. You should now have pile of flowers with their lower leaves removed ready to be trimmed and put in water.

For any soft stems use either your floral snippers or scissors.  
Cut each stem at an angle - make the angle as sharp as you can - this exposes more of the stem and allows more water to be absorbed. But be careful not to to crush flowers that has soft or hollow stems - it's easily done. If this happens re-cut the stem with less of an angle. 

Cutting the stems at an angle also means that the stems will not sit against the bottom of the vase and reduce any uptake of water.

Make the cut just above a node - the slightly thicker part of the stem from where the leaves grow - on most flowers you can find the nodes at regular intervals along the stems. Cutting just above a node helps water absorption.

Have your container of water ready and after the cut immediately plunge the flower into water.


4. I cannot emphasise the importance of keeping your cutting tools as sharp as you possibly can.

It's very easy to crush the soft stems when you cut them - so the sharper and cleaner the cut - the less damage is done to the bottom of the stems, the more water will be absorbed and the longer the the flowers will last. 


5. You will need to use a pair of secateurs or strong snippers to cut any woody stems. Again, cut at an angle - above a node and then make another additional vertical clean cut up from the base of the stem. 

For a long time you were given the advise to crush or mash the bottom of woody stems with a hammer. Don't do that! It makes the perfect breeding ground for bacteria and less water will be absorbed because of the damaged cell tissues.

Again - after the cuts plunge the branches straight into some water.   


Here is a link to the first Arrange Your Flowers! - # 1 - Essential Tools for Cut Flowers

Here is a link to the second Arrange Your Flowers! - # 2 - How to Keep Your Cut Flower Tools Clean and Sharp

I'll be back in two weeks with more advice on how to 'Arrange Your Flowers!'. 

Have a Creative Floral Day!

~ xoxo ~


Ingrid

[Styling and photography © Ingrid Henningsson for Of Spring and Summer.]

24 September 2014

Arrange Your Flowers! - # 2 - How To Keep Your Cut Flower Tools Clean and Sharp


This is the second instalment of 'Arrange Your Flowers!' - and it's all about keeping your flower buckets and vases free from bacteria and how to keep your tools clean and sharp.

1. It's very important to keep your vases and containers scrupulously clean. Always clean the containers you use when conditioning your flowers after each use. 

After every time you discard a bunch of flowers give the used vase a good clean. Cut flowers start to decay as soon as they are cut and any decaying stems in the vase produces bacteria. Any build-up of bacteria in the vase will further shorten the life and increase the deterioration of the flowers.

If you live in an area with hard water - calcium deposits will also build up on the inside of the vases and leave white or light-brown powdery or scaly deposits. With very stubborn stains you might have to use some kind of scouring pad or very fine steel wool. Just go gently and make sure you don't scratch that old crystal vase! 

2. Hot soapy water and a bit of scrubbing is usually all you need to do. Use a dish brush for any larger vases or the flower buckets. For smaller vases with narrow necks use a bottle brush.

You can also buy tubs of little copper beads that you swirl around with water. They will remove any build-up of stains in hard to reach places. The beads are reusable so clean, dry and store them for next time.

You are often given the advice to use bleach for cleaning vases. I don't use bleach - its not environmentally friendly and there are too many questions surrounding it's usage and what it does to the environment and our health. 


3. Another important thing is to keep your cutting tools clean and sharp.

Just like with containers and vases - grime, dirt and bacteria will build up on your scissors, snippers and secateurs. They get sticky from the sap in the flower stems and leaves; and will eventually develop a brown residue on the blades. You will have to clean this of with hot soapy water - you can use the same dish brush that you use for cleaning your vases and containers. You might sometimes have to go over the blades with some steel wool. After washing and drying - wipe the blade with some oil to prevent any rust and to keep it working smoothly.

4. Sharpen your tools on a regular bases. The sharper they are the cleaner the cut. It's very important that you don't crush the stems. A crushed stem means that less water will be absorbed by the stems and transported to the flowers and leaves - and will result in your flowers not lasting as long.

There are all kinds of sharpening tools out there to buy or you might already have a steel for sharpening your kitchen knives. It's not too difficult to learn how to sharpen a pair of scissors or snippers - it just takes a little practice. After sharpening you should wipe the blades with some oil to prevent rusting.

Here is a link to the first 'Arrange Your Flowers!' - # 1 - Essential Tools for Cut Flowers.

I'll be back next month with more advice on how to 'Arrange Your Flowers!'. 

Have a Creative Floral Day!

~ xoxo ~

Ingrid


[Styling and photography © Ingrid Henningsson for Of Spring and Summer.]

3 September 2014

Arrange Your Flowers! - # 1 - Essential Tools for Cut Flowers


This is a new series of blog posts called 'Arrange Your Flowers! and I'll be posting them on a regular basis.

It's all about arranging your own flowers - it will have do-it-yourself flower arranging ideas, tips and advice - and will be very easy to follow - even if you've never done any flower arranging before. 

It will be very basic and very down to earth.

So let's start from the beginning!

These are the most basic but essential tools that you need to start doing your own flower arranging:

1. A couple of different size containers - they can be plastic or metal. Nothing fancy, it's just a container to put the flowers in after you've conditioned them. Traditionally florists flower buckets were metal - mostly zinc but now they tend to be plastic. 

2. A pair of floral snippers or floral scissors - like the black handled scissors and snippers in the image . Buy a pair that is comfortable to use and that will not hurt your hand - if you are using them for a long time. 

It's quite useful to have both a pair of snippers and a pair of scissors. The scissors will be useful to cut elastic bands around the flower stems and for cutting the cellophane that the flowers come wrapped in - it's easier to do that with a pair of scissors. Floral scissors or florists' scissors are a bit more sturdy and have stronger blades than a normal pair of scissors - so are also excellent for cutting flower stems. 

In the end it's a personal choice and what you are the most comfortable using. 

3. You will also need a pair of secateurs or pruners for cutting thicker stems or branches - like the red handled secateurs in the image. If you don't already own a pair - get a good quality one - as they usually last a lifetime. 

I hope all my tips will be useful and easy to follow and that they will help to keep your flowers looking good and last longer.

Have a Creative Floral Day!

~ xoxo ~

Ingrid

[Styling and photography © Ingrid Henningsson for Of Spring and Summer.]


Related Posts Plugin for WordPress, Blogger...
